Navigation
Install the app
How to install the app on iOS
Follow along with the video below to see how to install our site as a web app on your home screen.
Note: This feature may not be available in some browsers.
More options
You are using an out of date browser. It may not display this or other websites correctly.
You should upgrade or use an alternative browser.
You should upgrade or use an alternative browser.
W203 Interior mirror ambient Light
OP
OP
verytalldave
MB Enthusiast
Its good to discover something on your car you didnt even know existed.
This ambient light is a rather nice feature in my opinion.
I suspect there are very many cars being driven around where the bulb has blown and the owner doesn't even realise the fact.
This ambient light is a rather nice feature in my opinion.
I suspect there are very many cars being driven around where the bulb has blown and the owner doesn't even realise the fact.
renault12ts
MB Club Veteran
- Joined
- Mar 5, 2009
- Messages
- 16,674
- Car
- 2005 W215 CL500.
Right!! I drove my car for 10 months before I discovered it. And it works !!
crankiejohn
Active Member
does the 2002 180 elegance have the light in the mirror,i cant see any glow in the dark or any mention of it in the hand book
OP
OP
verytalldave
MB Enthusiast
does the 2002 180 elegance have the light in the mirror,i cant see any glow in the dark or any mention of it in the hand book
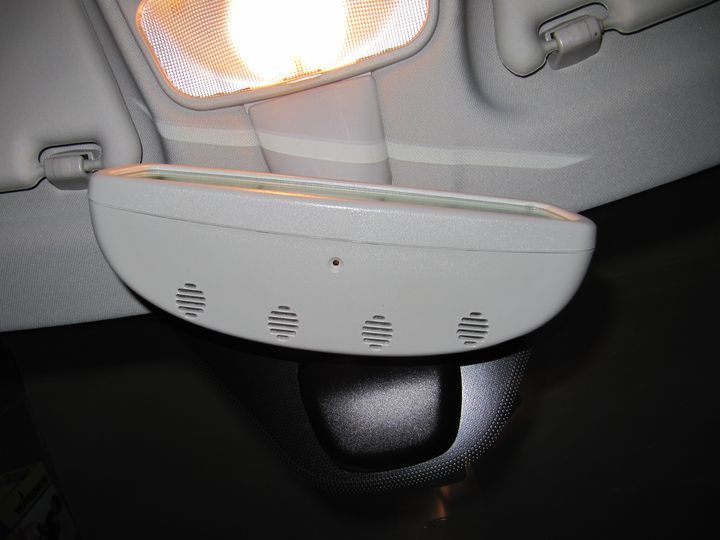
In daylight look at the bottom of the mirrors plastic body.
If yours has an ambient light, then its located in the centre of the mirror on the bottom.
It may look like a small dark orange coloured bud no more than about 1-2 mm diameter (its very small).
I seem to recall reading somewhere that this feature was added at the 2004 facelift revamp. But I might be wrong.
So its possible you may not have this on your car.
High-Lo
MB Enthusiast
- Joined
- Sep 7, 2004
- Messages
- 1,798
- Location
- Kent
- Car
- 2013 X166 Mercedes GL350, Porsche 911 Carrera 4 Cabriolet, Porsche 968 Cabriolet
My 2000 E320 has this too. Also the same amber light lighting up the passenger and driver footwells permanently. It really does add to the ambience ")
OP
OP
verytalldave
MB Enthusiast
Yes. The E class of course is in a league above the C class, and as such will have more of these nice touches - and on earlier models.
It doesn't surprise me one bit that your 2000 E has got this feature.
It does make me wonder how I would find a modern S class....................it must be absolutely awash with gadgets and gizmos..........
It doesn't surprise me one bit that your 2000 E has got this feature.
It does make me wonder how I would find a modern S class....................it must be absolutely awash with gadgets and gizmos..........

renault12ts
MB Club Veteran
- Joined
- Mar 5, 2009
- Messages
- 16,674
- Car
- 2005 W215 CL500.
My 2000 E320 has this too. Also the same amber light lighting up the passenger and driver footwells permanently. It really does add to the ambience
And the rear footwells and, look very carefully, the interior door releases.
OP
OP
verytalldave
MB Enthusiast
It seems many need or want to do this quick fix to a blown ambient liight.
So I have pasted and copied the details here for all to see..............
Instructions for fitting an LED replacement “ambient” light in a post 2004 W203
These instructions are to help in replacing the normal filament “ambient” light bulb as fitted in the interior rear view mirror in a Mercedes C Class facelift W203 with a LED.
Please note I take no responsibility for the accuracy of these instructions although they are made in good faith. Anyone who undertakes this task does so completely and totally at his or her own risk. No claims accepted.
Before continuing further, I would strongly suggest you read this report: -
http://www.mbworld.org/forums/c-clas...ew-mirror.html
It is a detailed write-up of a guy in the USA who has done this modification. However, it should only be used as a rough guide as there are important differences between what he says and what you actually have to do.
Now continue………………
In the pack included with these instructions are the following 6 items:-
Check all the items are present and identify which is which.
Take all the items and assemble as described below ready for fitting into car. Refer to the sketches/diagrams for help and clarification.
Apologies for the quality of the sketch, but I think it serves to show how all the items are identified and connected. Should you need further clarification, please feel free to email me at [email protected]
Take the assembly into the car. Using a suitable tool, prise the front grey plastic surround off the front of the mirror. Be careful not to mark the soft plastic and use a broad bladed object (not a sharp screwdriver blade or knife). This could mark the plastic. The surround is held in place by about 6 plastic clips and once you have unclipped a few you can get your fingers in to pull off the complete surround. It takes a degree of effort to remove as the clips are quite strong.
Before continuing, make sure you don’t have the key in the ignition.
Be careful, as the mirror will drop out of its position. It is held in place by some wires to a plug and socket. You can unplug the mirror if you find it gets in the way but remember to reconnect the plug correctly if you do before testing.
There are 4 black soft foam inserts, which will drop out if you are not careful. If they do, then put back in place before re-assembly.
Now comes the interesting bit.
Locate the old bulb, which is held in place by a clip. Unclip the bulb and its orange cover. Cut the two wires connected to the lamp about 10mm from the bulb. Both are coloured black. Retain the old bulb and clip and put somewhere safe.
Strip a short length of insulation off the 2 wires you have just cut. As both wires are coloured black, you cannot tell which wire is the positive and which is the negative. Therefore, it’s a 50/50 chance of getting it correct on the first attempt. Connect one of the wires to the resistor side of the LED and then connect the other wire to the other wire on the LED. Make sure all bare wires and connections are insulated.
Now to test whether you have connected it all up the right way round.
If you have removed the mirror and unplugged its connector, replace correctly before testing, otherwise the LED wont work.
Place key in the ignition and switch on to bring up the ignition lights.
Does the LED light? If not, then switch off ignition and remove key.
Swap over and reverse the both the connections around to the LED.
Place key in ignition and switch on again. This time the LED will light (if it didn’t before).
Success. All you now need to do is fit the LED into its retaining clip.
However, before you can do that, you will need to slightly enlarge the hole in base of the mirrors plastic body. To do this you can use either a small drill or something similar. What I used was the hole maker on a Swiss Army penknife. With one of these, you can slowly and gradually enlarge the hole until you just get it to just the perfect fit.
Clip the LED retaining clip into place through the body of the mirror and click the LED into its retaining clip until it fits into place with a small “click”. It really is a matter of trial and error this bit and the trick is to take it slowly and carefully. Don’t enlarge the hole too much. Do it gradually and take your time to get it just right. Once the LED is fitted into its clip, and before you replace the mirror and its surround, check that its all still working OK. Providing its all OK, then replace the mirror and the plastic surround. Ensure all wires and things are not trapped by the plastic surround.
Job done ! !
I know it sounds fiddly and a long job, but its not too bad, providing you don’t panic and take your time.
I think the whole job took me less than an hour from start to finish.
All you need to do now is wait for nighttime to test your handiwork.
And these are additional instructions to help purchase the items if required..............
When reading the instructions above its obvious that they are meant to accompany the kit (of which I don't have any left), so you will need to perhaps do things SLIGHTLY different depending on the resistor and LED you use. You may not need to use a retaining clip for example.
The LED's generally come in two sizes. The "normal" size and a smaller size. Either will do, but I used the smaller size one. Its more than bright enough. Also the resistor only needs to be a small quarter watt. A little cheapy one will do.
I dare say both could probably bought from Maplins, but I got mine from Ebay.
Just looked at their ebay website and they are selling these which are pre-wired with inbuilt resistor. Even easier................
5 FOR £1.89 with free P&P. Thats a good price. You can have 4 as spares ! ! ! !
Look here..............
5 x Pre wired 3mm Bright Yellow LEDs - Prewired 12V LED on eBay (end time 14-Feb-10 14:31:14 GMT)
Or they sell other colours......purple...blue....green.....etc...etc....its your choice. I stuck to the original yellow/amber.
And you will need only one of these to hold the LED in place................
20 x 3mm Black Plastic LED Clip Holders - Bezels Cases on eBay (end time 03-Feb-10 13:37:09 GMT)
so you will have 19 spare ! ! ! !
Let me know if you need any further info.............
Good luck.........
So I have pasted and copied the details here for all to see..............
Instructions for fitting an LED replacement “ambient” light in a post 2004 W203
These instructions are to help in replacing the normal filament “ambient” light bulb as fitted in the interior rear view mirror in a Mercedes C Class facelift W203 with a LED.
Please note I take no responsibility for the accuracy of these instructions although they are made in good faith. Anyone who undertakes this task does so completely and totally at his or her own risk. No claims accepted.
Before continuing further, I would strongly suggest you read this report: -
http://www.mbworld.org/forums/c-clas...ew-mirror.html
It is a detailed write-up of a guy in the USA who has done this modification. However, it should only be used as a rough guide as there are important differences between what he says and what you actually have to do.
Now continue………………
In the pack included with these instructions are the following 6 items:-
- 1 off 12 volt amber colour LED
- 1 off 470 ohm resister
- 4 small terminal blocks
- Length of black insulation sleeve
- Length of small gauge wire
- LED retaining plastic clip holder
Check all the items are present and identify which is which.
Take all the items and assemble as described below ready for fitting into car. Refer to the sketches/diagrams for help and clarification.
Apologies for the quality of the sketch, but I think it serves to show how all the items are identified and connected. Should you need further clarification, please feel free to email me at [email protected]
- If you have a small low wattage soldering iron, then you can dispense with the terminal blocks and solder the items together. This is preferable, but not important.
- Take the LED and to the longer of its 2 wires, connect the resistor as shown. Use the insulation supplied over all exposed wires and leads.
Take the assembly into the car. Using a suitable tool, prise the front grey plastic surround off the front of the mirror. Be careful not to mark the soft plastic and use a broad bladed object (not a sharp screwdriver blade or knife). This could mark the plastic. The surround is held in place by about 6 plastic clips and once you have unclipped a few you can get your fingers in to pull off the complete surround. It takes a degree of effort to remove as the clips are quite strong.
Before continuing, make sure you don’t have the key in the ignition.
Be careful, as the mirror will drop out of its position. It is held in place by some wires to a plug and socket. You can unplug the mirror if you find it gets in the way but remember to reconnect the plug correctly if you do before testing.
There are 4 black soft foam inserts, which will drop out if you are not careful. If they do, then put back in place before re-assembly.
Now comes the interesting bit.
Locate the old bulb, which is held in place by a clip. Unclip the bulb and its orange cover. Cut the two wires connected to the lamp about 10mm from the bulb. Both are coloured black. Retain the old bulb and clip and put somewhere safe.
Strip a short length of insulation off the 2 wires you have just cut. As both wires are coloured black, you cannot tell which wire is the positive and which is the negative. Therefore, it’s a 50/50 chance of getting it correct on the first attempt. Connect one of the wires to the resistor side of the LED and then connect the other wire to the other wire on the LED. Make sure all bare wires and connections are insulated.
Now to test whether you have connected it all up the right way round.
If you have removed the mirror and unplugged its connector, replace correctly before testing, otherwise the LED wont work.
Place key in the ignition and switch on to bring up the ignition lights.
Does the LED light? If not, then switch off ignition and remove key.
Swap over and reverse the both the connections around to the LED.
Place key in ignition and switch on again. This time the LED will light (if it didn’t before).
Success. All you now need to do is fit the LED into its retaining clip.
However, before you can do that, you will need to slightly enlarge the hole in base of the mirrors plastic body. To do this you can use either a small drill or something similar. What I used was the hole maker on a Swiss Army penknife. With one of these, you can slowly and gradually enlarge the hole until you just get it to just the perfect fit.
Clip the LED retaining clip into place through the body of the mirror and click the LED into its retaining clip until it fits into place with a small “click”. It really is a matter of trial and error this bit and the trick is to take it slowly and carefully. Don’t enlarge the hole too much. Do it gradually and take your time to get it just right. Once the LED is fitted into its clip, and before you replace the mirror and its surround, check that its all still working OK. Providing its all OK, then replace the mirror and the plastic surround. Ensure all wires and things are not trapped by the plastic surround.
Job done ! !
I know it sounds fiddly and a long job, but its not too bad, providing you don’t panic and take your time.
I think the whole job took me less than an hour from start to finish.
All you need to do now is wait for nighttime to test your handiwork.
And these are additional instructions to help purchase the items if required..............
When reading the instructions above its obvious that they are meant to accompany the kit (of which I don't have any left), so you will need to perhaps do things SLIGHTLY different depending on the resistor and LED you use. You may not need to use a retaining clip for example.
The LED's generally come in two sizes. The "normal" size and a smaller size. Either will do, but I used the smaller size one. Its more than bright enough. Also the resistor only needs to be a small quarter watt. A little cheapy one will do.
I dare say both could probably bought from Maplins, but I got mine from Ebay.
Just looked at their ebay website and they are selling these which are pre-wired with inbuilt resistor. Even easier................
5 FOR £1.89 with free P&P. Thats a good price. You can have 4 as spares ! ! ! !
Look here..............
5 x Pre wired 3mm Bright Yellow LEDs - Prewired 12V LED on eBay (end time 14-Feb-10 14:31:14 GMT)
Or they sell other colours......purple...blue....green.....etc...etc....its your choice. I stuck to the original yellow/amber.
And you will need only one of these to hold the LED in place................
20 x 3mm Black Plastic LED Clip Holders - Bezels Cases on eBay (end time 03-Feb-10 13:37:09 GMT)
so you will have 19 spare ! ! ! !
Let me know if you need any further info.............
Good luck.........
Last edited:
D
Deleted member 2227
Guest
Big thankyou to Verytalldave for these instructions. I fixed my ambient light today easily thanks to your thread. Cheers!
Incase anyone found this thread via google, like i did, i have created a new post with pictures to supplement the excellent instructions from verytalldave
http://www.mbclub.co.uk/forums/electronics/126685-how-w203-ambient-light-replacement.html
http://www.mbclub.co.uk/forums/electronics/126685-how-w203-ambient-light-replacement.html
Geoff A
Active Member
Can these mirrors be swapped between models? Reason I ask is our SLK doesn't have this amber light on the bottom of the RVM and it makes the interior very dark at night......
I'd like to fit our SLK with a mirror that offers this feature. Has anyone here done this? Any advice gratefully received, thanks
I'd like to fit our SLK with a mirror that offers this feature. Has anyone here done this? Any advice gratefully received, thanks
mmm, I might do this mod, but my RVM doesnt already have a light.
If I wire it directly to the cabling, what colour cable do I need to solider it to?
If I wire it directly to the cabling, what colour cable do I need to solider it to?
grumpyoldgit
MB Enthusiast
Very interesting thread, thanks for bumping it up guys and a big thank you to verytaledave for the original post and instructions and also to JayBird for his step by step pictures.
Must admit it's something I hadn't realised was there and I'm still not entirely sure but it looks promising. There is a small hole in the bottom of my mirror so fingers crossed.
Must admit it's something I hadn't realised was there and I'm still not entirely sure but it looks promising. There is a small hole in the bottom of my mirror so fingers crossed.
Users who are viewing this thread
Total: 1 (members: 0, guests: 1)
Similar threads
- Replies
- 5
- Views
- 709
- Replies
- 0
- Views
- 584
- Replies
- 2
- Views
- 746