350_Coupe
Active Member
ok, the simple task of changing the rear number plate on my 203 Coupe caused me more of a headache than i expected, so figured i'd post the fix here, in the hope it helps someone else in the future.
Originally, before i purchased my car, it was on private plates, and the garage that swapped them back used some nasty cheap steel screws to refit the original plates, recently the rear plate has been looking a little tired and scruffy, and was de-laminating around the fixings, and one was missing, i was also noticing some water/corrosion marks appearing from behind the plate, so i figured time to order up a new plate and see what was going on.
I used number1plates.com and ordered up a rear plate, with my car model printed below the registration, a black section to the side with "Eng" and the english flag, registration in Hi-Line text, cost was reasonable, the required proof was just driving license and v5 photo, and was pretty painless and didn't slow the job down any.
Plates arrives nice and quickly - notice i said "plates".... ordered and paid for only the rear, but they sent both happy with that, but that's where the good fortune stops !!
First thing i did was to look at the original plate closely, and saw that one of the screws was sheared off, great...... tried to remove the other lower screw, on the opposite side, only for that to simply snap off at the head after very little pressure was applied, great
As i said, it looks like after the private plates were removed, the screws fitted were cheap horrible steel ones, with no protective coating, so they had simply rotted
So that makes it both lower fixings out of action, luckily i was able to remove the top ones without too much trouble. At this point i realised this was not going to be a simple/easy/fast fix.
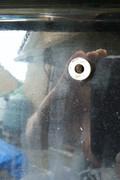
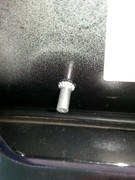
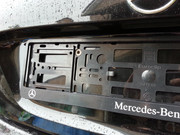
here's the problem fixings (after i cleaned the snapped screws and socket face back a little)


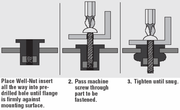
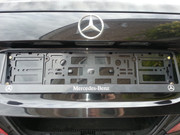
the 3rd image above shows how the fixing socket should look
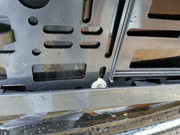
These "sockets" are aluminium, and are used because the rear hatch is fibreglass in that area (pictures from inside hatch below) so they use these rivet style threaded sockets, and by using steel screws, it had caused dissimilar metal corrosion, and not only caused the screws to rot and seize, but also to trash the aluminium surface too, causing the marks i was seeing below the number plate.
To try and remove these broken screws was likely going to cause more damage, drilling them out or trying ezy-outs was just not going to work.


At this point it became obvious that the original fixing method was out of the picture so to speak, for the lower fixings at least, and i had to find another solution.
The answer, those plastic number plate surrounds you see on ebay all the time and something called "Well Nuts" (x4).......


the well nuts are basically rubber top hat shaped items which have a brass threaded insert inside them, and come with a brass machine threaded screw, the ones i got required about an 8mm hole drilling, and work like this....

Now to solve the fixing to the car issue, firstly i decided that i wanted the mounting frame to be closer to the car than they would be if fitted to/on the original aluminium stand offs, so i made the frame fit around those by drilling matching holes in their locations, so they became locating pegs for the frame. (easier if you have a pillar drill you can use) here you can see 3 of the enlarged holes, i still had the lower left one to do when i took these pictures.


next, fit them to the car and mark where the new mounting holes will be for the Well Nuts, using masking tape to protect the paintwork when drilling (after drilling i used a small amount of black paint to coat the insides of the holes to seal the fibreglass)


Once the holes were drilled and the edges sealed with the paint, i also painted the original aluminium sockets to try and stop any further corrosion water marks from appearing, and then pushed the well nuts into position....


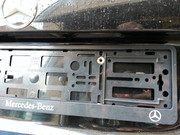
Finally i now have four good mounting points, and can attach the frame")


and from the inside, the well nuts look like this before/after the frame is fastened into place


Rear number plate now looks a lot better - only thing to note, is that on the plates i bought, the positioning of the flag and Eng text is not good when it comes to mounting the front plate, the flag is too high and the text too low to avoid hitting them with the mounting screws!

Now i just need to find some LED bulbs to illuminate it, that work without triggering the bulb out warning, and don't break within 6 months! i did buy some replacement fixtures, that are self contained and canbus compliant, which i was hoping would be a direct replacement for the ones i have, but, it turns out the ones i got only fit the saloon/estate, because the coupes fittings are shaped different unfortunately.... so i now have those to sell!
Originally, before i purchased my car, it was on private plates, and the garage that swapped them back used some nasty cheap steel screws to refit the original plates, recently the rear plate has been looking a little tired and scruffy, and was de-laminating around the fixings, and one was missing, i was also noticing some water/corrosion marks appearing from behind the plate, so i figured time to order up a new plate and see what was going on.
I used number1plates.com and ordered up a rear plate, with my car model printed below the registration, a black section to the side with "Eng" and the english flag, registration in Hi-Line text, cost was reasonable, the required proof was just driving license and v5 photo, and was pretty painless and didn't slow the job down any.
Plates arrives nice and quickly - notice i said "plates".... ordered and paid for only the rear, but they sent both
happy with that, but that's where the good fortune stops !!First thing i did was to look at the original plate closely, and saw that one of the screws was sheared off, great...... tried to remove the other lower screw, on the opposite side, only for that to simply snap off at the head after very little pressure was applied, great
As i said, it looks like after the private plates were removed, the screws fitted were cheap horrible steel ones, with no protective coating, so they had simply rotted
So that makes it both lower fixings out of action, luckily i was able to remove the top ones without too much trouble. At this point i realised this was not going to be a simple/easy/fast fix.
here's the problem fixings (after i cleaned the snapped screws and socket face back a little)
the 3rd image above shows how the fixing socket should look
These "sockets" are aluminium, and are used because the rear hatch is fibreglass in that area (pictures from inside hatch below) so they use these rivet style threaded sockets, and by using steel screws, it had caused dissimilar metal corrosion, and not only caused the screws to rot and seize, but also to trash the aluminium surface too, causing the marks i was seeing below the number plate.
To try and remove these broken screws was likely going to cause more damage, drilling them out or trying ezy-outs was just not going to work.
At this point it became obvious that the original fixing method was out of the picture so to speak, for the lower fixings at least, and i had to find another solution.
The answer, those plastic number plate surrounds you see on ebay all the time and something called "Well Nuts" (x4).......
the well nuts are basically rubber top hat shaped items which have a brass threaded insert inside them, and come with a brass machine threaded screw, the ones i got required about an 8mm hole drilling, and work like this....
Now to solve the fixing to the car issue, firstly i decided that i wanted the mounting frame to be closer to the car than they would be if fitted to/on the original aluminium stand offs, so i made the frame fit around those by drilling matching holes in their locations, so they became locating pegs for the frame. (easier if you have a pillar drill you can use) here you can see 3 of the enlarged holes, i still had the lower left one to do when i took these pictures.
next, fit them to the car and mark where the new mounting holes will be for the Well Nuts, using masking tape to protect the paintwork when drilling (after drilling i used a small amount of black paint to coat the insides of the holes to seal the fibreglass)
Once the holes were drilled and the edges sealed with the paint, i also painted the original aluminium sockets to try and stop any further corrosion water marks from appearing, and then pushed the well nuts into position....
Finally i now have four good mounting points, and can attach the frame
and from the inside, the well nuts look like this before/after the frame is fastened into place
Rear number plate now looks a lot better
- only thing to note, is that on the plates i bought, the positioning of the flag and Eng text is not good when it comes to mounting the front plate, the flag is too high and the text too low to avoid hitting them with the mounting screws!Now i just need to find some LED bulbs to illuminate it, that work without triggering the bulb out warning, and don't break within 6 months! i did buy some replacement fixtures, that are self contained and canbus compliant, which i was hoping would be a direct replacement for the ones i have, but, it turns out the ones i got only fit the saloon/estate, because the coupes fittings are shaped different unfortunately.... so i now have those to sell!
Last edited: