n13
Member
Push window down button for the driver side... *grind grind grind* window still up.
Ok. Regulator replacement time... how much?? About £100 on eBay and close to £250 for a new one. + Fitting?? I think I’ll have a see what’s wrong with it first:
Things you will probably need:
TX30, 25, 20
Panel removal tools
Removing CLS door card/panel:
-follow guide here
User: jparrott
File: Door card guide
Or Mercedes way here
Once the card is off, be careful with the wires, I disconnected them all makes things a lot easier.
Put the now removed card out of the way.
Removing regulator
I detached the motor from the regulator and pushed the window down to remove its clamping arrangement (thinking back, I should have marked up where the window is and where all the plates are). And then lifted the window right up and hooked its front mounting section over the seal.
Mercedes way: here
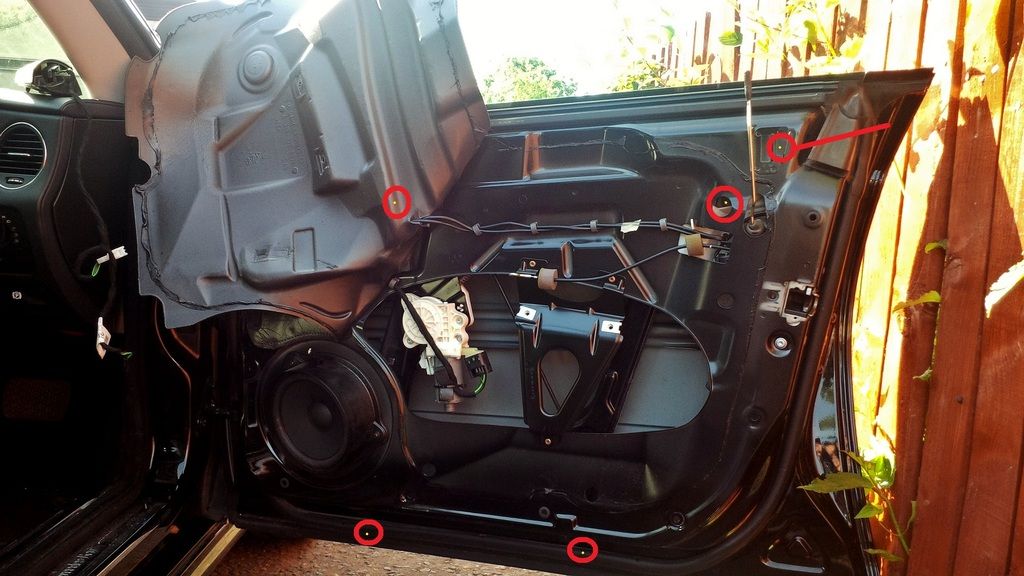
The nut near the door handle is accessed behind a small bung in the end of the door (90 degrees to the rest of the nuts) this nut only needs to be loosened but I just removed it...
The other 3 nuts are easy to find and remove.
It is a bit of a fiddle to remove the regulator but took me a min or so to solve the puzzle.
Once it’s out and you have the broken regulator:

Inside the house where it is warmer (including some bits I needed):

I found the cable a local car/bicycle parts shop (motor mania) I’m not sure what the cable is for as it had no sheath and both ends were terminated? But the critical parts were correct: 1.5mm diameter and 3m long is a good length.
Here is my plan of what the situation was:

the length of the wires is critical, ensure the crimps are positioned at the right length (deduct the length of the crimp if measure total length or slide crimp up to measured length as its the internal dimension which is critical)
Also before crimping anything, ensure all sheaths and other parts are on the cable beforehand! (I forgot at one point and had to file a crimp off)
I made the crimps out of aluminium about 6mm dia with a 1.6mm hole in the middle about 5 or 6mm long.
You will need 5 crimps in total.
Take a full dimensional survey before snipping anything as your wires maybe different lengths, as it happens all the dimensions I took turned out to be 940mm (see above)
I had to do lots of filing to get the new crimps to fit in the various slots.

I tried electrical crimps, but these pulled off:

I did have some trouble fitting the cable length adjuster, as it has some ratchet device in it, which makes it impossible to compress the spring fully if the cable is inserted. Therefore you have to compress the spring then insert the cable BEFORE you crimp the end...

Once all the cables are sorted you can start to reassemble the regulator:
It’s the same as disassembly, but winding the cable onto the wheel can be tricky especially scene as both wires need to be on at the same time.
Wind the cable coming from the top of the regulator first (with both sliders in the "up" position) should take 3/4 turns. The cable coming from the bottom of the regulator should go around maybe 0.25 of a turn (ensure the spring is still fully squashed on the length adjustment) once that's complete, you can release tension on the spring.
Double check the slide is being held by the crimp on the single crimp side and its pretty much ready to go... after some greasing!! I only had silicone grease:


Move the sliders up and down to ensure they work ok.
Refitting regulator
It goes back in the same way. I tried to line up the nuts with the marks that were previously there to ensure the regulator goes back in the same place. (As the window alignment will take a while) align and marking on the window if done so.
Once it’s all bolted in, reconnect the wiring for the regulator motor and the door card (should be able to have the door open on the 1st click and still have all the wires connected) just be very careful with the little ribbon cables for the door lights. These rip off very easily if the door card drops (I know)
Now a test can be conducted, followed by lots of adjustments. Ensure the window is in the same place as it was when the motor was disconnected (in my case it was up - as I pushed the window back down)
When testing the window with the door closed (to check seal) you will need the little black piece of plastic from around the door latching mechanism fitted, as this pushed the door closed switch. And operated the little movement that occurs when the door is closed. (Took me a little time to figure that out)
and that's pretty much it.
a £2 cable and a couple of hours doing something i find fun. win win situation.
hope it helps somebody else as it seems to be fault everybody will see at some point.
Ok. Regulator replacement time... how much?? About £100 on eBay and close to £250 for a new one. + Fitting?? I think I’ll have a see what’s wrong with it first:
Things you will probably need:
TX30, 25, 20
Panel removal tools
Removing CLS door card/panel:
-follow guide here
User: jparrott
File: Door card guide
Or Mercedes way here
Once the card is off, be careful with the wires, I disconnected them all makes things a lot easier.
Put the now removed card out of the way.
Removing regulator
I detached the motor from the regulator and pushed the window down to remove its clamping arrangement (thinking back, I should have marked up where the window is and where all the plates are). And then lifted the window right up and hooked its front mounting section over the seal.
Mercedes way: here
The nut near the door handle is accessed behind a small bung in the end of the door (90 degrees to the rest of the nuts) this nut only needs to be loosened but I just removed it...
The other 3 nuts are easy to find and remove.
It is a bit of a fiddle to remove the regulator but took me a min or so to solve the puzzle.
Once it’s out and you have the broken regulator:
Inside the house where it is warmer (including some bits I needed):
I found the cable a local car/bicycle parts shop (motor mania) I’m not sure what the cable is for as it had no sheath and both ends were terminated? But the critical parts were correct: 1.5mm diameter and 3m long is a good length.
Here is my plan of what the situation was:
the length of the wires is critical, ensure the crimps are positioned at the right length (deduct the length of the crimp if measure total length or slide crimp up to measured length as its the internal dimension which is critical)
Also before crimping anything, ensure all sheaths and other parts are on the cable beforehand! (I forgot at one point and had to file a crimp off)
I made the crimps out of aluminium about 6mm dia with a 1.6mm hole in the middle about 5 or 6mm long.
You will need 5 crimps in total.
Take a full dimensional survey before snipping anything as your wires maybe different lengths, as it happens all the dimensions I took turned out to be 940mm (see above)
I had to do lots of filing to get the new crimps to fit in the various slots.
I tried electrical crimps, but these pulled off:
I did have some trouble fitting the cable length adjuster, as it has some ratchet device in it, which makes it impossible to compress the spring fully if the cable is inserted. Therefore you have to compress the spring then insert the cable BEFORE you crimp the end...
Once all the cables are sorted you can start to reassemble the regulator:
It’s the same as disassembly, but winding the cable onto the wheel can be tricky especially scene as both wires need to be on at the same time.
Wind the cable coming from the top of the regulator first (with both sliders in the "up" position) should take 3/4 turns. The cable coming from the bottom of the regulator should go around maybe 0.25 of a turn (ensure the spring is still fully squashed on the length adjustment) once that's complete, you can release tension on the spring.
Double check the slide is being held by the crimp on the single crimp side and its pretty much ready to go... after some greasing!! I only had silicone grease:
Move the sliders up and down to ensure they work ok.
Refitting regulator
It goes back in the same way. I tried to line up the nuts with the marks that were previously there to ensure the regulator goes back in the same place. (As the window alignment will take a while) align and marking on the window if done so.
Once it’s all bolted in, reconnect the wiring for the regulator motor and the door card (should be able to have the door open on the 1st click and still have all the wires connected) just be very careful with the little ribbon cables for the door lights. These rip off very easily if the door card drops (I know)
Now a test can be conducted, followed by lots of adjustments. Ensure the window is in the same place as it was when the motor was disconnected (in my case it was up - as I pushed the window back down)
When testing the window with the door closed (to check seal) you will need the little black piece of plastic from around the door latching mechanism fitted, as this pushed the door closed switch. And operated the little movement that occurs when the door is closed. (Took me a little time to figure that out)
and that's pretty much it.
a £2 cable and a couple of hours doing something i find fun. win win situation.
hope it helps somebody else as it seems to be fault everybody will see at some point.