• The Forums are now open to new registrations, adverts are also being de-tuned.

Mercedes W114 250 Coupe - help!

Charles

When I was "restoring" the LR I started the day with a "planning meeting" (a hearty breakfast) usually followed by a "procurement trip" (A drive out over the New Forest to Paul Light Landrovers to buy parts, stop and admire the scenery or buy parts on-line with coffee and cake :) )

Your day sounds like enough of a reason to charge and raise another glass to your efforts !
 
Sounds just like my day, just substitute Slough for the New Forest...
 
I think what you are up against here is 'pulling' the outer bearing. Basically this is freeing the inner race from the stub axle and removing allowing the disc and hub to be removed with each bearing separating into halves.
What should work is following up to instruction #3 (linked pages), then refit the clamping nut and screw on until flush with the stub axle end (tightening the locking bolt won't hurt). Then strike the locking bolt to impart a force through the stub axle pin's axis with a heavyish steel hammer. Hit hard enough, and squarely (while applying an outward pull on the disc) but not so hard that the (still vulnerable thread) can sustain damage. The aim is to 'shock' it free. For this to work the clamping nut must be free from the inner race when flush with the stub axle end (not abutting it). Check this by first screwing it on further than required then unwinding until flush as described. It is not acceptable to apply a shock force across the bearing if the bearing is to be reused. The above procedure (with some releasant) should be enough to dislodge the inner race from the stub and allow removal. NB the inner race should be a sliding fit on the stub as it has to move to provide correct preloading of the taper bearing by hand pressure. When you feel the inner race move, remove the clamping nut and carefully (to avoid damaging the bearing components mounted in the hub) remove the disc hub assembly.

(Within the same document is mentioned the inadvisability of mixing grease types. If unfamiliar with what is being referred to, please say, and I will advise)
 
I read that and thought I understood it.

That makes me nervous.

I'll read it again.
 
Read it again.

Now I'm getting visions of ball bearings going all over the place.

That also makes me nervous.

I'll read it again tomorrow am.
 
More instructive is to study the diagram. The inner part of the outermost bearing is the part that has to be removed. Once that is off, everything just slips over the top like removing a sweater.
It (inner race) is ready to move once the clamping nut and washer is removed. Only needs a little coercion (shock) to free its grip from the stub pin and refitting the clamping bolt is merely to protect the threads from the (mild to medium) hammer blows.
 
Tapered rollers rather than balls, and they will be retained in cages and the grease will stop them jumping anyway. Once it is apart you will see how simple it all is.
 
Right, reading the diagram it begins to make sense.

I shall do it tomorrow as if I make a mistake I can order and pick up the replacement bearings from Niemoller in Germany at the same time as my other parts!
 
I'll be online tomorrow. Any problems, just holler.
 
Looking today the hub is packed with nice clean grease, so I'm hopeful that underneath should be fine.
 
Perhaps Tony attended to the bearings in the earlier part of the restoration. Presumably you are only pulling the hubs to remove/replace the discs. If the grease truly looks fresh then consider covering the exposed stub axle with a freezer bag and seal from dirt the bearings in the hub. If successful in keeping dirt out you can reassemble once the disc is fitted without having to replicate Tony's work.
If so, consider leaving hubs in situ - once you are confident that they are easily removed - until the day of disc replacement as it best guarantees cleanliness.
 
Needless to say the link is down, so no progress on that here - I am inclined to leave it for the pros to sort, looking at the grease again in daylight it isn't quite so pristine. Given all the discs need changing, if Tony hasn't done the bearings it strikes me as a good thing to get them done as they are available and not greatly expensive.
 
If you can stand KB's usual failure to come to the point :wallbash: then these two videos are worth a brief look. Like most of these "front bearing" videos- the hubs in question are simply removed by hand- no pullers required!!!:rolleyes:
[YOUTUBE HD]_XG5-nijsU0[/YOUTUBE HD]

[YOUTUBE HD]fB_g1SA-KIA[/YOUTUBE HD]
 
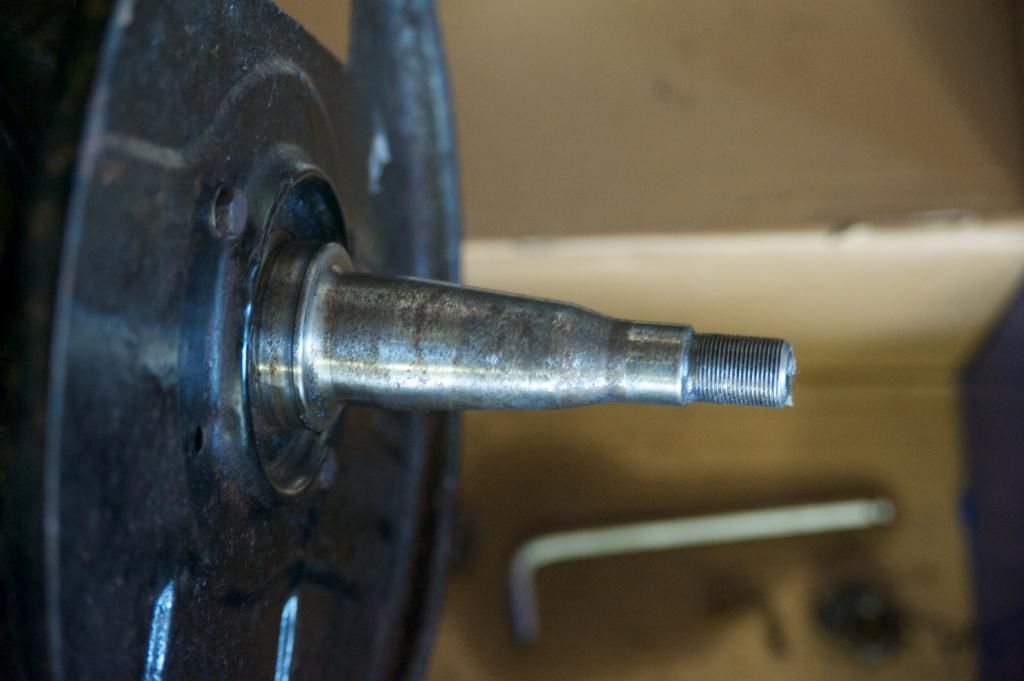
Thanks Ken! Getting that off was a POP, which it wouldn't have been from the book. The rubber grease seal was as hard as the vid. Later I'll post a pic of the axle end which looks to my untutored eye to be OK, but second opinions welcome.
 
Axle - absolutely no scoring, pitting, blueing but mild discolouration in places that originally I thought was rust but surface perfect.

w114frontaxleos_zpset3lsjmg.jpg
 
If you prise out the seal it should be possible to withdraw the inner race from the inner bearing and inspect it for wear. If there is an absence of a worn groove, scoring, discolouration, or any other discontinuity in its wear surface, the chances are the bearing is reusable. Which will save you the ball ache of removing and fitting the outer races in the hubs.
If the bearing hasn't lost its rotational orientation on removal, I'd expect any wear to be at a maximum at the 12 O clock position. And, if you are doing the above with a view to reusing the bearings, keep the old seals - they will be required to press in new seals, a very simple task.
 
I am going to put the bearings to one side and have a look at them with Tony, as he has a very good magnifying glass for his model railway making and also some experience.

Dead chuffed that no brute force or ignorance required on this!

I can also get the brake rear plate off and give it a clean and repaint, which will start making everything look nicer.
 
I am going to put the bearings to one side and have a look at them with Tony, as he has a very good magnifying glass for his model railway making and also some experience.

A good idea.

Dead chuffed that no brute force or ignorance required on this!

Then why didn't it jump with the rubber mallet yesterday?
 
Possibly because I merely waved a rubber hammer in its general direction to keep the hub on its toes.

Today I undid the hex bolt etc.

The hex bolts holding on the hub to the disc are going to be an utter b to get off. My Allen key doesn't reach in far enough to get an adequate grip and the socket Allen key fouls the centre of the hub.
 

Users who are viewing this thread

Back
Top Bottom