• The Forums are now open to new registrations, adverts are also being de-tuned.

Mercedes W114 250 Coupe - help!

Post a diagram from the manual of the rear as per the one for the front and we'll figure it out. Be as well get one complete side of the car done while you have the cleaning materials and grease at hand.
If that is the LHS of the car you have dismantled - the other side will be fine.
 
I'm thinking the rear of a 114 will be the same as a 107. If so just get the disc off and refurb what you can see. The bearings are secured by a castellated nut from the inside and needs axleshaft out first. Also involves a crush washer on set-up and a way to measure endfloat. Several OE special tools required.

 
So job for specialist not idiot then?

Just going through your book Derek, packed with useful info!
 
As Derek says rears are not so straightforward as the fronts- unless you are experiencing problems I would tend to leave well alone at least for now. Due to the labour involved it would be shortsighted not to replace the bearings while in there--- and as already hinted at ----the replacements might not be as good as the originals :dk: http://mb.bolinko.org/wis/w114/Chassis/35-130.pdf
 
Last edited:
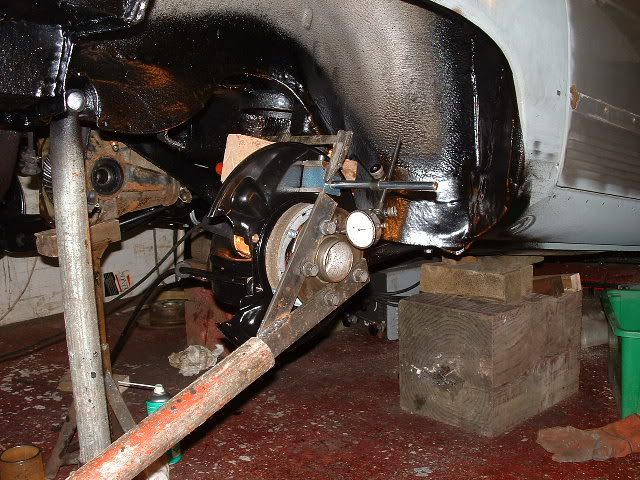
I did mine in 2002 as part of the total chassis refurb. It involved borrowing (ahem) the special castellated socket which fits the hidden nut and fabbing up the holding fork shown above which is needed to restrain the flange while the nut is done up in small increments until the specified endfloat is obtained. As measured by dialgauge shown. Go just a tad too far and it's all back in bits again till a fresh one-shot spacer is bought.
 
An odd day, calipers arrived in very good nick, Tony2 has got the compressor running with the overhauled control unit and yet more parts bought. Miserable chill air though so looking forward to spring re-appearing.
 
Get yourself one of these Possum-Marino jobbies Charles, no such thing as chill air in one of them - guaranteed and you can still move around with ease unlike a leather arrangement.

Welcome to Manawatu Knitting Mills
 
A much warmer day so I enjoyed the sunshine and fitted a battery to my BMW which is going to be revived.

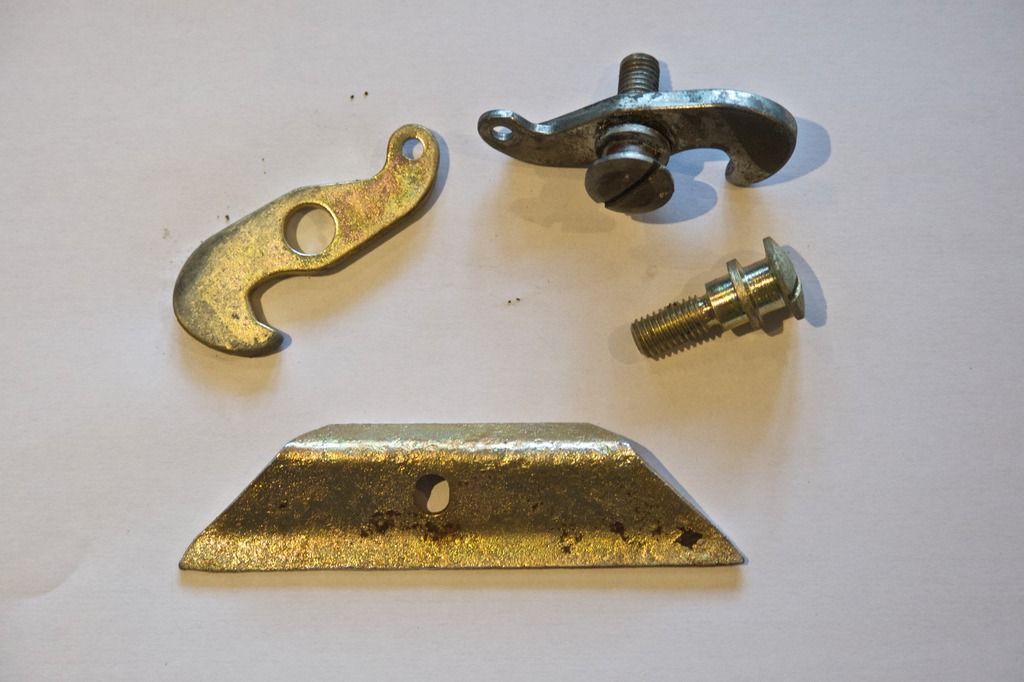
I decided to commission the zinc plating kit, as I want to start getting all the bits cleaned up and re-plated now I have the kit and the ultrasonic cleaner. For my first attempt I used the badly rusted battery retaining clamp from the BMW, used the rotary wire brush, ultrasound and a bit of emery paper but the surface is poor. I also tried two good parts from my seat locks with the untreated ones also depicted. The zinc plating works well, and to finish both were passivated with a bit of blue and some yellow. A bit more attention to pre-cleaning and polishing and I think this will work well.

plating_zpskvez44ny.jpg
 
Did some much better plating* today until the voltage regulator (a single wire coil which you clamp the anode power wire at varying lengths from the positive terminal so as to regulate the rate of plating) melted. I had foreseen this might happen so had ordered something more 21st century yesterday.

Correct front brake disc arrived today as did rear pad replacement kit, with luck by Friday I'll have all the grease, parts and things to put the front and rear calipers (which arrived yesterday and look lovely), pads and discs back, which means I can turn the car around. Hopefully the blank plug for the compressor will also arrive so I can really crack on with blasting the wheels too.

*zinc layer beautiful, yellow passivate too strong, so it needs a bit of a tone down.
 
Last edited:
Blank plug for the compressor arrived this morning, oh joy oh bliss, now fitted, perished air hose ends removed and the compressor is holding 5 bar comfortably, which I think is plenty. The sun is out and the wheels are ready for a blast!
 
Keep going Charles :thumb:
 
Blinking walnut shells are not being blown out (works fine with the remaining sand). So back to sand. Grrr...
 
Fine glass blasting particles were found at my local builders merchant (he supplies Pinewood studios and they age wood by particle blasting it). They rather lack mass so it took a very long time and a lot of it to get the wheel to a point where it's more stripped than not. Particles got everywhere and my mobile blasting pit (the wheelbarrow) helped funnel them straight back at me. The compressor held up well, but this really uses the air in huge volume.

My Niemoller parts order arrived today too, with numerous important goodies like a new door in primer.
 
I noticed on another forum DIY electrolysis being utilised to strip metal back. Didn't pay a lot of attention to the mechanics or chemistry of it but the results looked impressive.
 
I am going to use that for the larger bits of rusty metal. I don't really like removing rust through methods that strip it away as that is a permanent loss of metal - fine for bits that can be welded but not great for those that can't. Ultrasound and the chemical cleaning treatments prior to plating don't really remove it properly so plating is poor.

Now I am beginning to get what plating is about, I intend to design my own kit to plate the small stuff. It might just involve a lot of fish hooks!
 
Another big parts day - all the rubber seals arrived from MBclassics, brake parts that Jan the post lady left with Tony and Jill while I was out, and I bought a very good original nearside front wing from a very nice guy in Oxford who has two 115s he is restoring. Chatting to Tony I mentioned I'd damaged the front brake pipe getting the hose off as it was seized in, no bother he said, I'll make you up another one!

Time to make some space and do some filing!
 
Last edited:
It must look like a DPD Depot Charles ?
 
It resembles more the inside of the UPS van that delivered me my Niemoller order yesterday.

I am going to have a big sort out and labelling exercise. It really doesn't help when an order containing about 50 parts has no label on each one!
 
Thought folks might appreciate this piccy?
 
Last edited:

Users who are viewing this thread

Back
Top Bottom