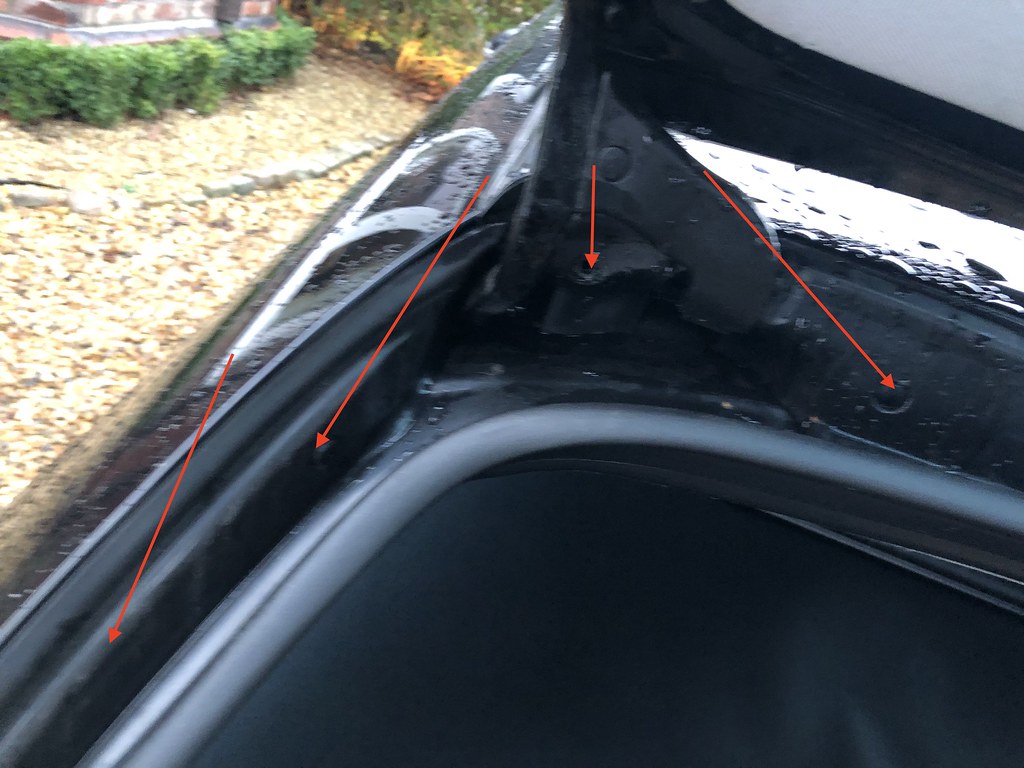
[FONT="]I replaced my lazy S211 tailgate struts today. Here are a few notes which might help you if you are considering the job yourself. It took me about an hour to do the first side and 15 minutes to do the next side as by then I knew what I was doing.
I got the new ones from ebay, listed as Febi Bilstein 32045 and 32046 for about £50 each which is less than half the main dealer price. They turned out to be identical to the original and once I opened the packaging I found they were labelled Stabilus just like the originals. You might want to also buy some spare expanding plastic trim rivets as they're easily damaged.
The MB procedure which has been posted on this forum previously is pretty good but these notes might help. Note that this procedure applies to cars without the automatic opening tailgate. To do the job you'll need:[/FONT]
- [FONT="]A small flat blade screwdriver.[/FONT]
- [FONT="]A big flat blade screwdriver.[/FONT]
- [FONT="]A torx screwdriver.[/FONT]
- [FONT="]A long reach flat tool. I used a long wooden ruler.[/FONT]
- [FONT="]A really bright torch and preferably a head torch too.[/FONT]
- [FONT="]Something to prop the tailgate up. I used 32mm PVC waste pipe.[/FONT]
- [FONT="]Suitable tools to remove / release plastic trim rivets.
[/FONT]
- [FONT="]Open the tailgate and prop it up safely. Replace one gas strut at a time. Be careful that your prop doesn't fall out when you've got your fingers in the mechanism. The tailgate is surprisingly heavy and I think you could easily mangle your fingers if things went wrong.
[/FONT] - [FONT="]Working in the car, remove the cargo net securing trim in the headlining using a Torx screwdriver. Do this before your hands get dirty.[/FONT]
- [FONT="]Using your long flat tool (e.g. long wooden ruler) through the box section accessible near the tailgate hinge release the plastic cover plate from the end of the section by applying downward pressure on the plastic cover plate release tab. You'll need to shine a bright torch into the box section to see what you need to do.[/FONT]
- [FONT="]Working in the car again, recover the plastic cover plate through the hole in the head lining. It's a bit fiddly to remove unless you've got long fingers.
[/FONT] - [FONT="]Remove the 2 plastic expanding rivets that secure the trim which covers the tailgate hinges and loosen the trim. You don't need to take it out completely - just move it out of the way.[/FONT]
- [FONT="]Pull away the tailgate rubber seal trim in the region of the hinge and down the side edge of the tailgate.[/FONT]
- [FONT="]Remove the 5 plastic side-trim expanding rivets and ease the trim to one side.You don't need to take this trim off completely and if you do try it might break at its narrowest point next to the rear light cluster.[/FONT]
- [FONT="]Using a small flat-blade screwdriver, release the ball-joint locking spring tab from the end of the gas spring. There is a flat on the outer edge of the gas strut socket which you can push a small flat screwdriver in. If you then lever the locking spring tab just enough to unlock the ball and socket.[/FONT]
- [FONT="]Using a big flat blade screwdriver, lever the balljoint socket of the gas strut off the hinge ball. You can carefully lever it against the hinge itself to do this. It comes off quite easily.[/FONT]
- [FONT="]Now wash your hands again or put on some vinyl gloves to avoid oily marks on the headlining[/FONT]
- [FONT="]Using a big flat bladed screwdriver poked through the cargo-net securing trim hole in the headlining, pry the gas strut balljoint socket off the ball which is attached to the car body.[/FONT]
- [FONT="]Ease the gas strut out from the area around the hinge.[/FONT]
- [FONT="]Check the new gas strut is identical and open it's locking spring tab a little.[/FONT]
- [FONT="]Slide the new gas strut roughly into position.[/FONT]
- [FONT="]Now the tricky part. You have to manoeuvre the end of the new gas strut so that it's socket part rests on the ball part which is attached to the car body. I found this easiest to do through the hole in the headlining. Take a good look with the torch then do it by feel.[/FONT]
- [FONT="]Once the balljoint socket is resting on the ball you can use a big flat blade screwdriver to push vertically down and snap it into place. It needs a fair bit of force.[/FONT]
- [FONT="]Press the other end of the balljoint socket onto the ball on the hinge in a similar manner. You might need to slightly raise the tailgate to get the alignment right before it will go on. Make sure the locking spring tab on the gas strut socket re-engages properly.[/FONT]
- [FONT="]Refit the covers and trims.
[/FONT] - [FONT="]Do the other side.[/FONT]
- [FONT="]Notify your other half about the work so they aren't taken by surprise by the energetic tailgate lift. They might also complain it's harder to close if they've got used to it dropping down easily.
[/FONT]


