awesome job, always had a soft spot for this shape, have had a CL55K and cant wait to get back into one, but credit to your workmanship and patience, if your looking to upgrade your wheels to the CL55k model then i have a set with tyres, relatively cheap, sorry for the free ad, but genuinely like what you have done to your car
Navigation
Install the app
How to install the app on iOS
Follow along with the video below to see how to install our site as a web app on your home screen.
Note: This feature may not be available in some browsers.
More options
You are using an out of date browser. It may not display this or other websites correctly.
You should upgrade or use an alternative browser.
You should upgrade or use an alternative browser.
Haylands
Active Member
- Joined
- May 22, 2012
- Messages
- 72
- Car
- 2000 CL500
Hi all
Not posted for a long while.... been building a cafe next door to my sarnie shop and been doing it all myself so been rather busy, also my mother had a stroke so been doing a 500mile round trip to see her, she is now nearly back to normal so good news there....
Did several thousand miles visiting her and did most of it in the Merc as it's just so much nicer to sit in it rather than the daily driver, a Volvo XC70... although the Volvo does do nearly twice as many MPG.....
On one of the trips home I set the cruise for 70mph and was pleasantly surprised by this
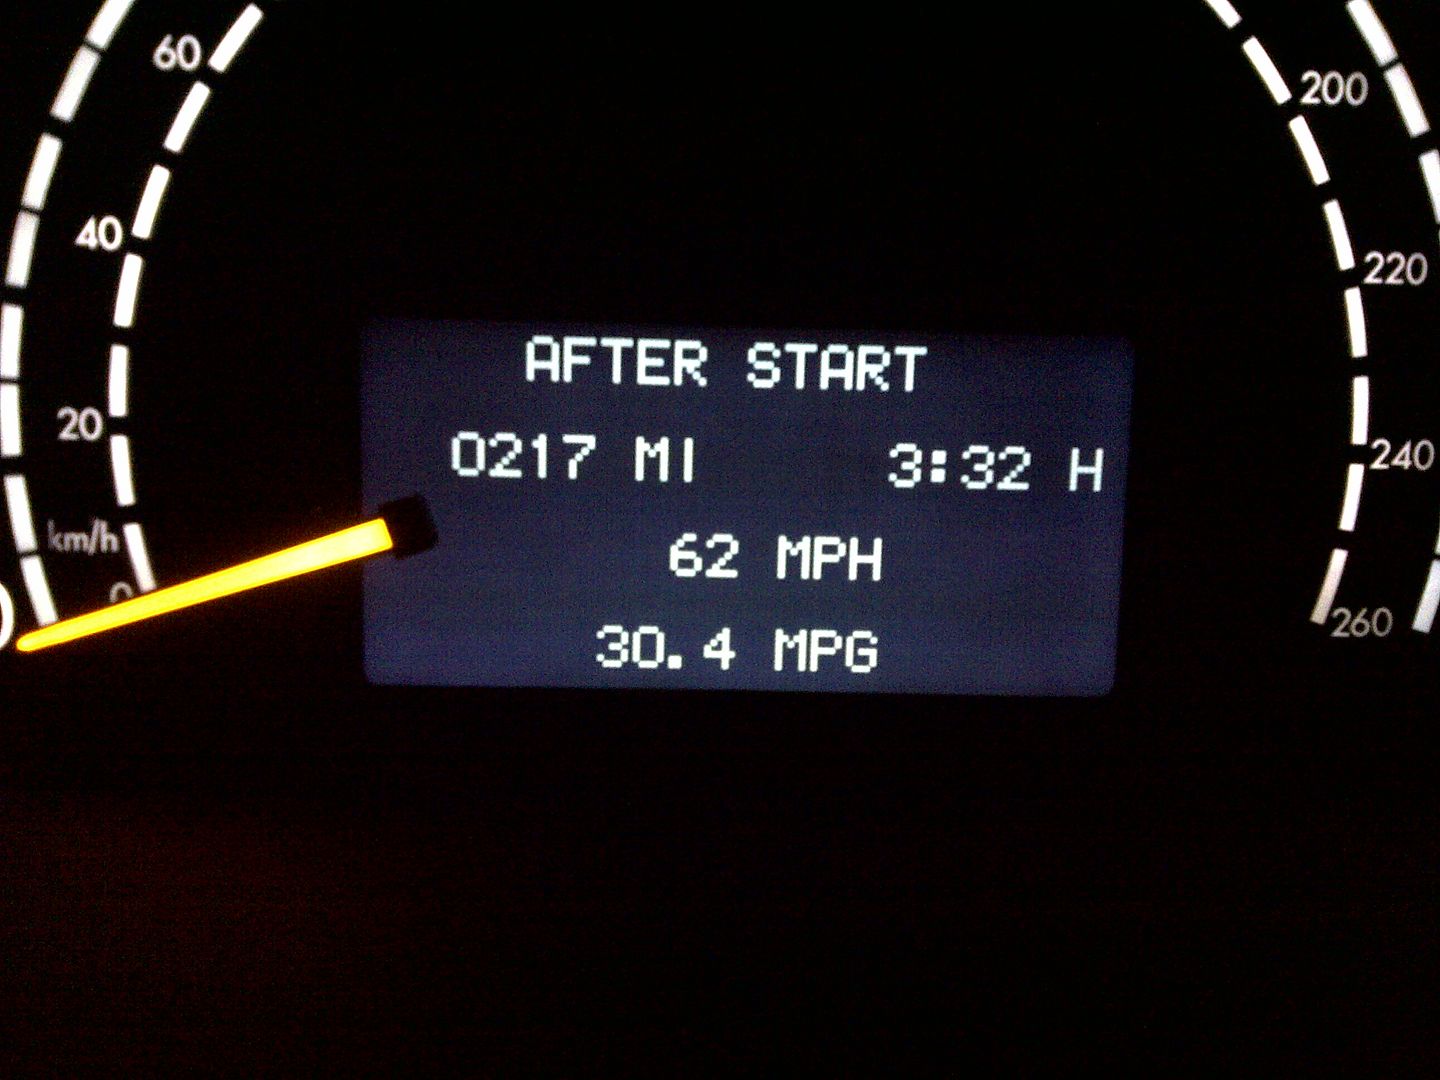
Over 30mpg.....!!!! very happy with that...
We had a weekend in Scotland booked... driving up the west side to Loch Marie, then onto the cost, head east and then back home to Hull
When I bought the Merc one of the few things not working was the lumbar supports in both front seats, they are controlled by vacume and being a two door with tip forward front seats the pipes had become hard and were leaking, the system times them out and switches them off if it detects a leak, so I disconnected the battery then reconnected it and listened for leaks... both front seats and under the rear seat as well.... I did plan to repipe them but it's a very lengthy job and I know from previous Mercs that they don't give me enough support anyway.... then remembered that the old Granada Coswsorth I had back in the 90s had stand alone electric pumped lumbar supports and as luck would have it I picked up some on ebay for £10 each

They come with a bladder, an electric motor and pump and just need 12v and earth to work, switch the + and - and they deflate...
took the back off the seat and you find this
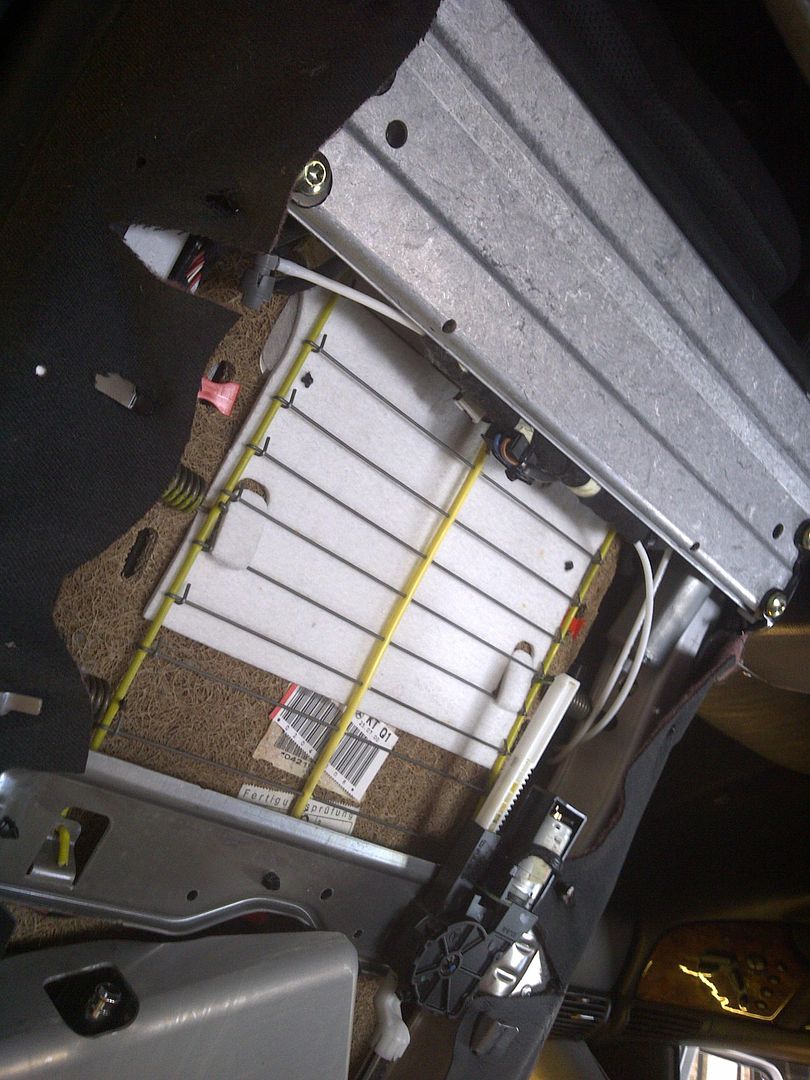
You can see the white pipes for the lumbar and the bladder is just under the white foam on the back of the rest..
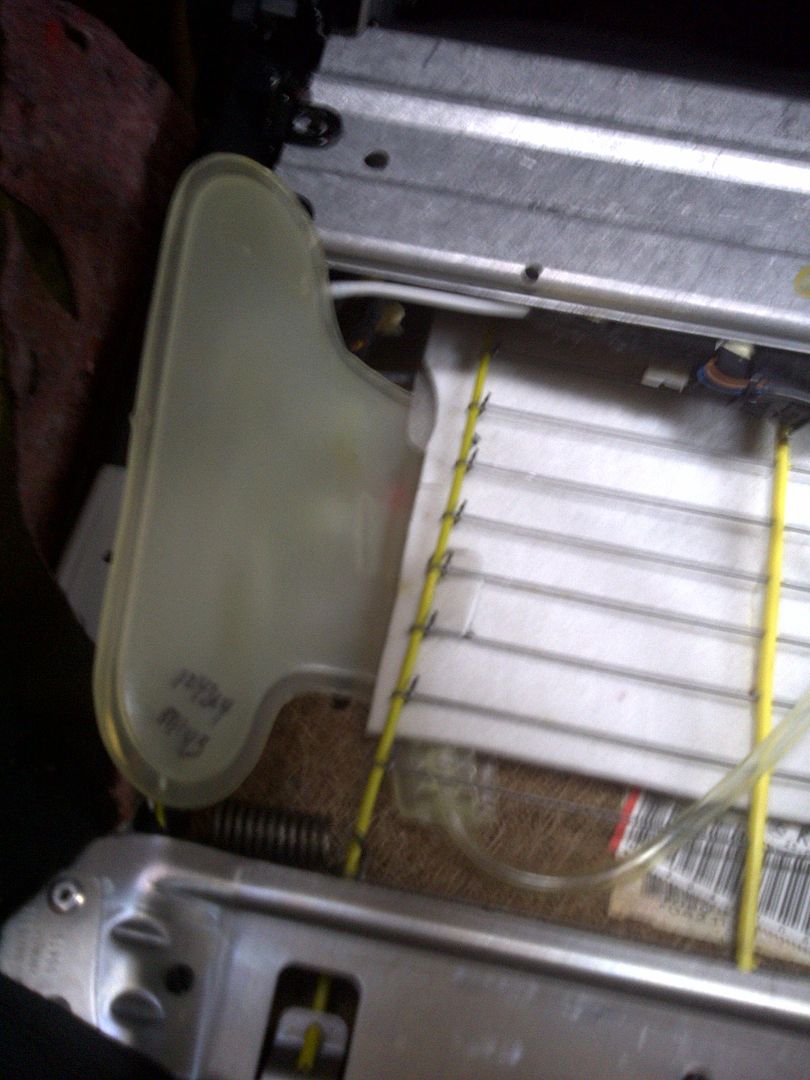
slid the new bladder in behind the panel and cut a slot for the inflation/deflation pipe, here you can see the pump in its plastic coated foam bag on the left side of the seat, it just fits in the space available, you can see the two electric wires waiting to be wired up
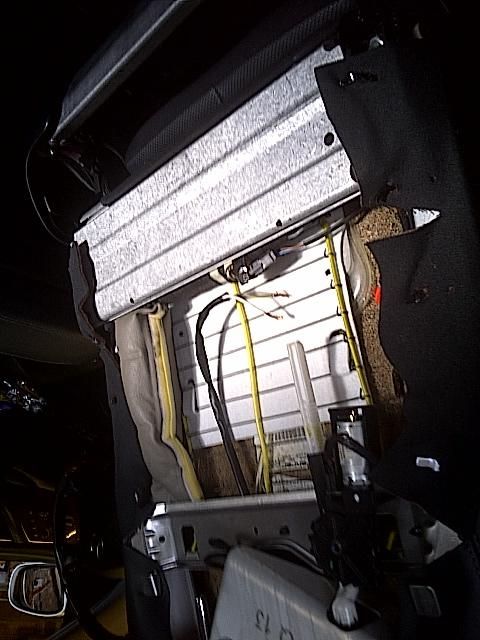
I bought some generic electric window switches and cut the original thumb wheel out of it's casing and fitted the new switches, there is already a good electric supply to under the seats so some wiring later and some fuses and it was ready to go... the switches look good as well... although why did Merc put a black plastic surround to them when the rest of the seat is charcoal??

Had been constantly moving the seats and opening and closing the doors whilst fitting them so decided to take it out for a quick spin to charge the battery and check everything was OK as it was only two days to the Scotland trip.... got home and pulled into the garage, got out and saw a line of fluid all up the drive.... was wondering what it was, turned around to see this slick growing from the rear wheel and the corner of he car sinking!!!!!!!
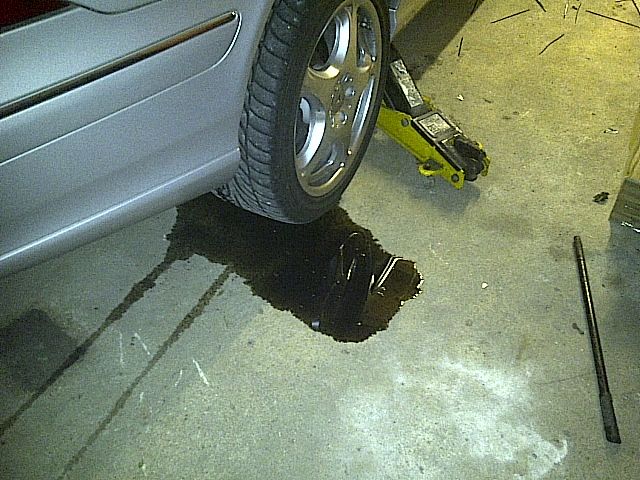
stuck a jack under it quick and took the weight but as it was late I left it to the next day to investigate...
It was the rear ABC pipe, I dropped the arch liner and found the pipe had been damaged at some point, looked like a tyre fitter had banged the tyre into the top center of the rear arch and bent the pipe against the bodywork, over time it had rubbed against the inner arch and worn a hole through... darn lucky it happened when it did, the oil stain went about 400yds down the road, if it had gone when we left for Scotland it would have lost all the fluid and taken the pump out as well...
I didn't have time to fix it myself so got the local indie to do it, the pipe is metal and rubber and goes from the rear strut to under the passenger seat so quite a job to get off... the pipe was £200 and he charged me £85 including the oil and reset the system....
We left for Scotland the next day and had a great time, found some lovely driving roads and some very nice hotels... the new lumbar's were great and the Merc didn't miss a beat,we did 1232 miles from Thursday morning till Sunday afternoon at an average speed of 53mph and did 25.5mpg
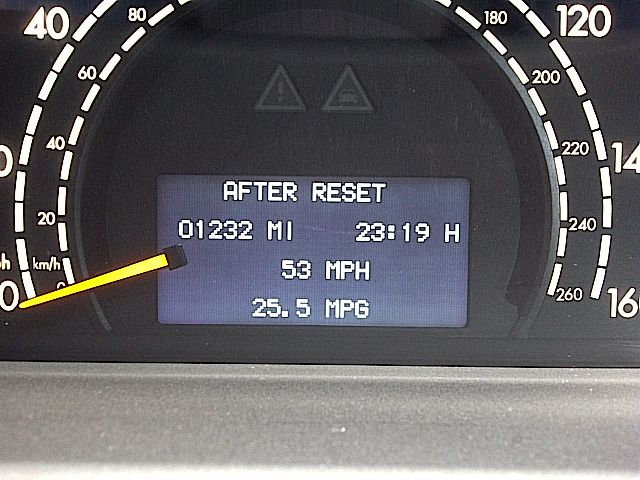
It's been sat in the garage for the last few weeks hiding from the salt,but were are spending the weekend in the peaks so it will get a run..
Not posted for a long while.... been building a cafe next door to my sarnie shop and been doing it all myself so been rather busy, also my mother had a stroke so been doing a 500mile round trip to see her, she is now nearly back to normal so good news there....
Did several thousand miles visiting her and did most of it in the Merc as it's just so much nicer to sit in it rather than the daily driver, a Volvo XC70... although the Volvo does do nearly twice as many MPG.....
On one of the trips home I set the cruise for 70mph and was pleasantly surprised by this

Over 30mpg.....!!!! very happy with that...
We had a weekend in Scotland booked... driving up the west side to Loch Marie, then onto the cost, head east and then back home to Hull
When I bought the Merc one of the few things not working was the lumbar supports in both front seats, they are controlled by vacume and being a two door with tip forward front seats the pipes had become hard and were leaking, the system times them out and switches them off if it detects a leak, so I disconnected the battery then reconnected it and listened for leaks... both front seats and under the rear seat as well.... I did plan to repipe them but it's a very lengthy job and I know from previous Mercs that they don't give me enough support anyway.... then remembered that the old Granada Coswsorth I had back in the 90s had stand alone electric pumped lumbar supports and as luck would have it I picked up some on ebay for £10 each

They come with a bladder, an electric motor and pump and just need 12v and earth to work, switch the + and - and they deflate...
took the back off the seat and you find this

You can see the white pipes for the lumbar and the bladder is just under the white foam on the back of the rest..

slid the new bladder in behind the panel and cut a slot for the inflation/deflation pipe, here you can see the pump in its plastic coated foam bag on the left side of the seat, it just fits in the space available, you can see the two electric wires waiting to be wired up

I bought some generic electric window switches and cut the original thumb wheel out of it's casing and fitted the new switches, there is already a good electric supply to under the seats so some wiring later and some fuses and it was ready to go... the switches look good as well... although why did Merc put a black plastic surround to them when the rest of the seat is charcoal??

Had been constantly moving the seats and opening and closing the doors whilst fitting them so decided to take it out for a quick spin to charge the battery and check everything was OK as it was only two days to the Scotland trip.... got home and pulled into the garage, got out and saw a line of fluid all up the drive.... was wondering what it was, turned around to see this slick growing from the rear wheel and the corner of he car sinking!!!!!!!

stuck a jack under it quick and took the weight but as it was late I left it to the next day to investigate...
It was the rear ABC pipe, I dropped the arch liner and found the pipe had been damaged at some point, looked like a tyre fitter had banged the tyre into the top center of the rear arch and bent the pipe against the bodywork, over time it had rubbed against the inner arch and worn a hole through... darn lucky it happened when it did, the oil stain went about 400yds down the road, if it had gone when we left for Scotland it would have lost all the fluid and taken the pump out as well...
I didn't have time to fix it myself so got the local indie to do it, the pipe is metal and rubber and goes from the rear strut to under the passenger seat so quite a job to get off... the pipe was £200 and he charged me £85 including the oil and reset the system....
We left for Scotland the next day and had a great time, found some lovely driving roads and some very nice hotels... the new lumbar's were great and the Merc didn't miss a beat,we did 1232 miles from Thursday morning till Sunday afternoon at an average speed of 53mph and did 25.5mpg

It's been sat in the garage for the last few weeks hiding from the salt,but were are spending the weekend in the peaks so it will get a run..
trainer
MB Enthusiast
Great to see you are getting a lot of enjoyment from the car.
Mercedes man
Active Member
Looks stunning a credit to you for all your hard work
michaelk3289
Active Member
- Joined
- Jan 13, 2011
- Messages
- 993
- Car
- 2007 W211 E280 CDI Avantgarde
thank you for a really interesting thread, really impressive what you have done to your car, the finish is incredible
love that version of CL and hope to join the club one day, hopefully sooner rather later
love that version of CL and hope to join the club one day, hopefully sooner rather later
Haylands
Active Member
- Joined
- May 22, 2012
- Messages
- 72
- Car
- 2000 CL500
Thanks chaps....
Mine came with the optional wood steering wheel,

Now I know they look very nice but they are not good for precise cornering, feed the wheel through your hands and the difference in friction between the wood and the leather is just too much for me.... so... some will say a retrograde step but I found a "new old stock" 2004 full leather steering wheel and I LOVE IT...!!!!

Also bought some cheap reproduction LED wing mirror lights, they fit very well and work fine too so pretty happy with them!!

Mine came with the optional wood steering wheel,

Now I know they look very nice but they are not good for precise cornering, feed the wheel through your hands and the difference in friction between the wood and the leather is just too much for me.... so... some will say a retrograde step but I found a "new old stock" 2004 full leather steering wheel and I LOVE IT...!!!!

Also bought some cheap reproduction LED wing mirror lights, they fit very well and work fine too so pretty happy with them!!

Borys
MB Enthusiast
Great,
Are you going to sell the old steering wheel?
Are you going to sell the old steering wheel?
- Joined
- Apr 15, 2005
- Messages
- 7,552
- Location
- Weybridge. U.K
- Car
- 500L ( W221 ), 2014 AMG CL 5.5 Biturbo ( W216 ) Sold, 2014 Brabus Smart ( 451 Coupe ) Mapped 130bhp
Just the facelift rear lghts now 

Haylands
Active Member
- Joined
- May 22, 2012
- Messages
- 72
- Car
- 2000 CL500
absolutely stunning, great job !
Thanks a lot
Great,
Are you going to sell the old steering wheel?
I'm open to offers if you fancy it otherwise it's going on ebay... a few on there in the high £200's
Just the facelift rear lghts now
I've studied them long and hard and come to the conclusion I prefer the earlier ones with the wider cut outs... The later ones are a bit fussey IMHO
Market forces.... he won't pay much rent, places up here are still very cheap, he won't pay more than minimum wage, there are that many out of work, the price he pays for paint and materials will be the lowest around as people just won't buy it if it's more....
I run a sandwich shop up here and we sell top quality produce, as much home made stuff as we can, we get flyers from places offering various products and giving the RRP... they are a joke, if we tried we wouldn't sell a thing... people just won't pay...
I've a mate with a paintshop in London and he's seen some of Mikes work and asked the price and thats exactly what he said.... "the bl@@dy materials cost more than that"
Also I made it easy for him, stripped it all off and cleaned it properly saves a lot of time, I must have spent 10-12 hours stripping and refitting
That's an amazing paint job on a now beautiful car, well done on that, however, i also run a paint shop in Newcastle upon Tyne and for £500 i wouldn't even look at it. We specialise in restorations and i've been lucky enough to team up with a guy who imports V.W campers, Karmann Ghias and the like, he supply's the bare shells and for a camper to be repaired properly and painted inside and out it's around the £3k mark, if i had to deal with the public and normal second hand traders id've closed it years ago, just too much hassle for very little margin. If your guy's paying the minimum wage he must go through staff at an incredible rate, his overheads, however cheap, plus his staff, consumables, removal of waste e.t.c. means i very much doubt he's making money, especially if, as you said, he's quiet, i hope he's there when you need him again.
Your car is beautiful, i hope you get many years enjoyment out of it.
Launcelot105
New Member
Great thread and great work, well worth all your effort. Must be so satisfying.
Haylands
Active Member
- Joined
- May 22, 2012
- Messages
- 72
- Car
- 2000 CL500
Thanks for the comments guys...
Well that dreaded MOT time had come round so I had to fix the only problem I knew of, the airbag warning light has been on for a while, had it code read and it was the driver’s side airbag so obviously suffering from the door loom problem (those who don't know it's the fact that it has the double opening hinges on the doors so they open wide but not far, makes the wiring to the door bend twice and get pulled every time you open the door, after a while the wires become work hardened and snap)
The only real fix is to take the whole loom out of the door, feed it back through to the drivers foot well and replace the wires one at a time, there are 28 wires and the vacuum pipe for the soft close doors, I bought some wire from eBay in assorted sizes and colours and started...
Door panel off (look on YouTube if you need to know how it comes off) then removed the keyless entry aerial unclip and unplug all the wiring harness and tape it up to feed it back through
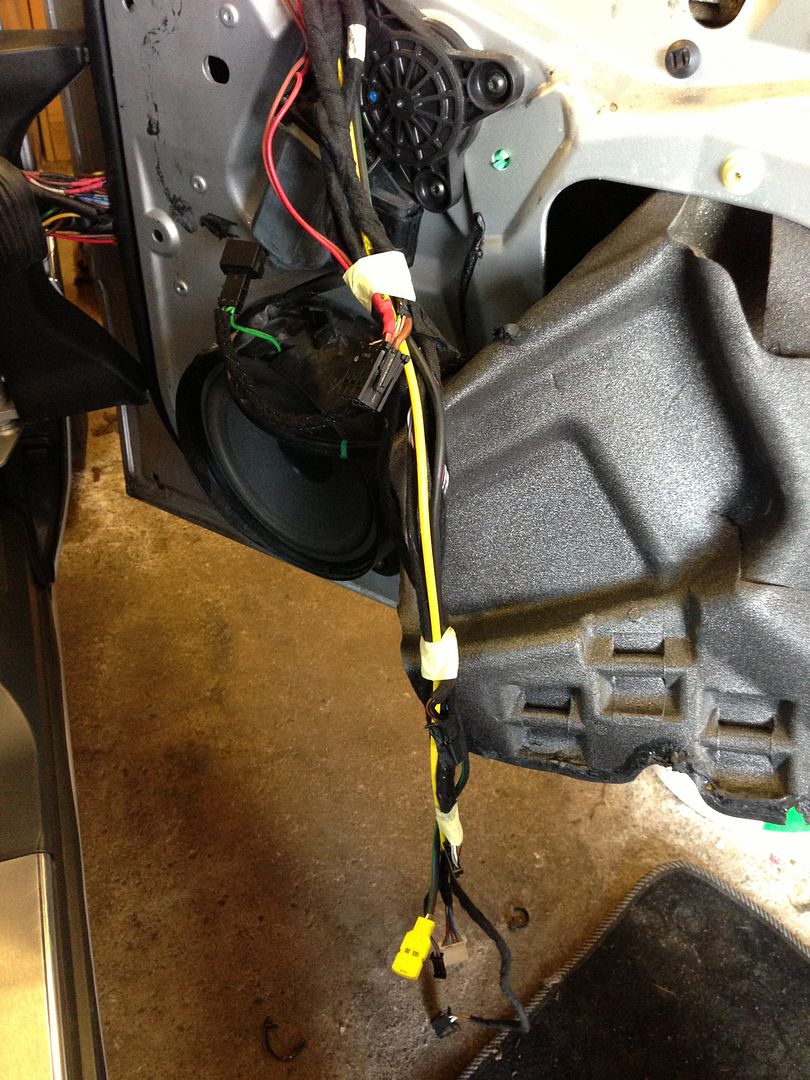
This is the tunnel they put from the face of the door through to the door jam, makes it easy to get the wires through
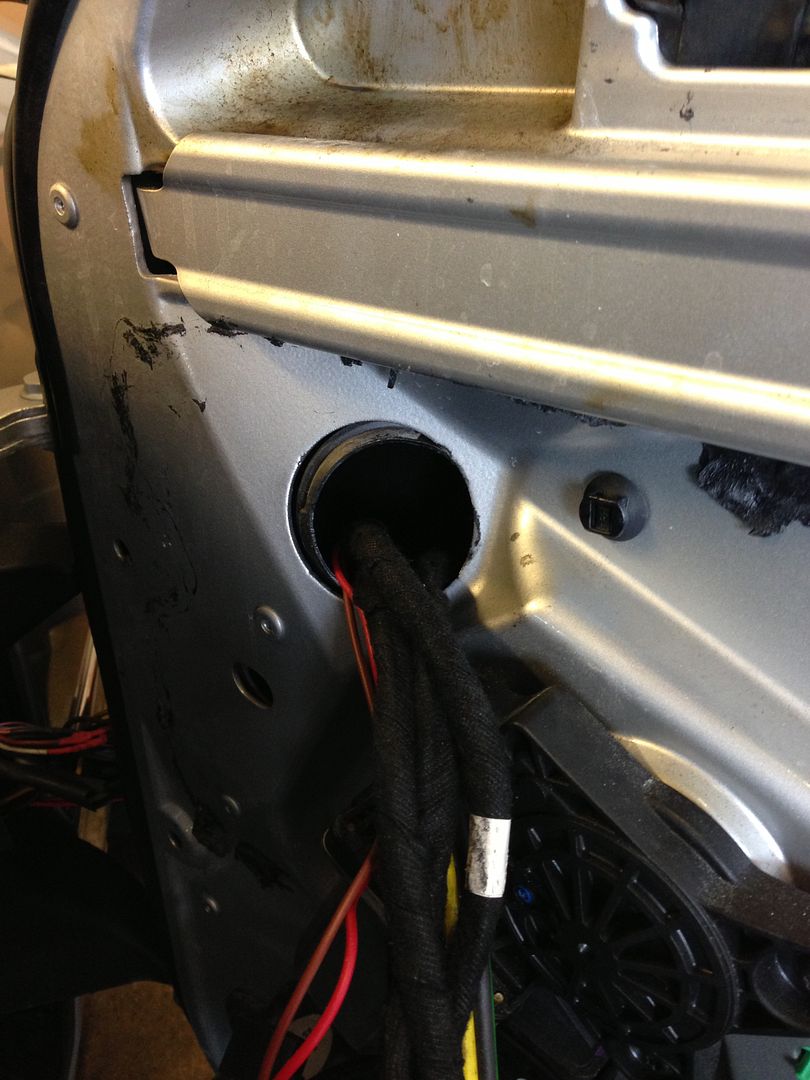
Started to pull it back through and you can see where someone has been in there before
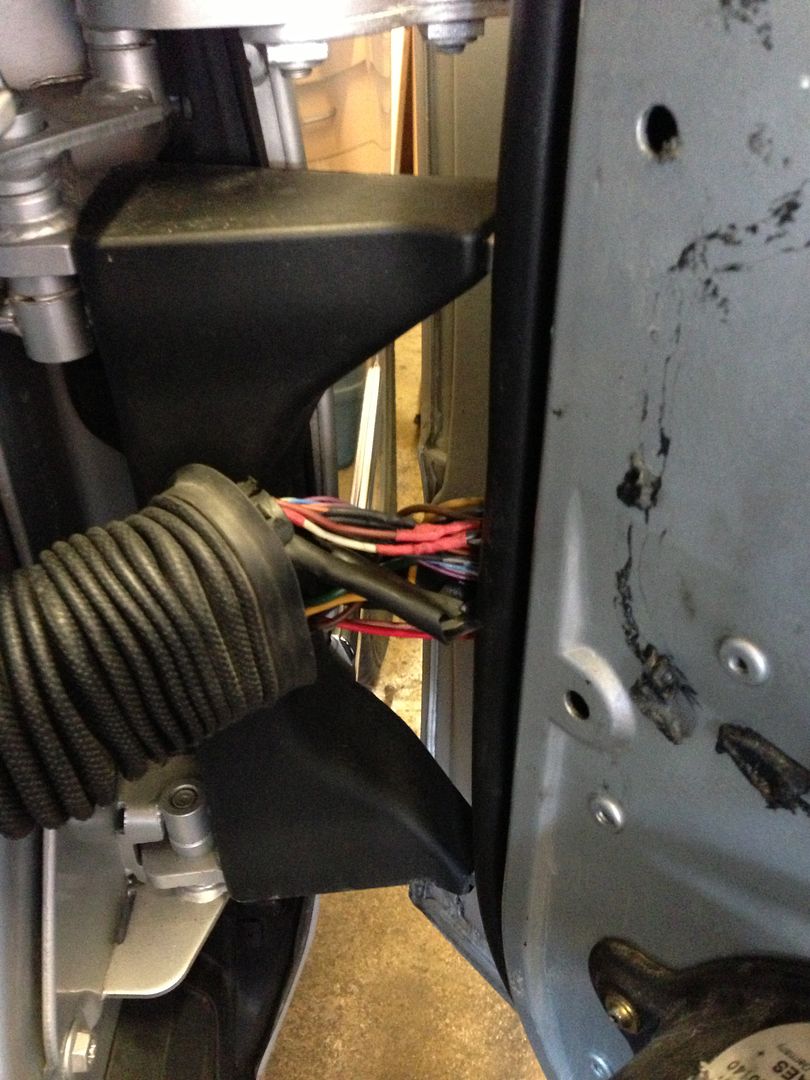
Pulled it back through and took the door jamb cover off and found this mess!!!
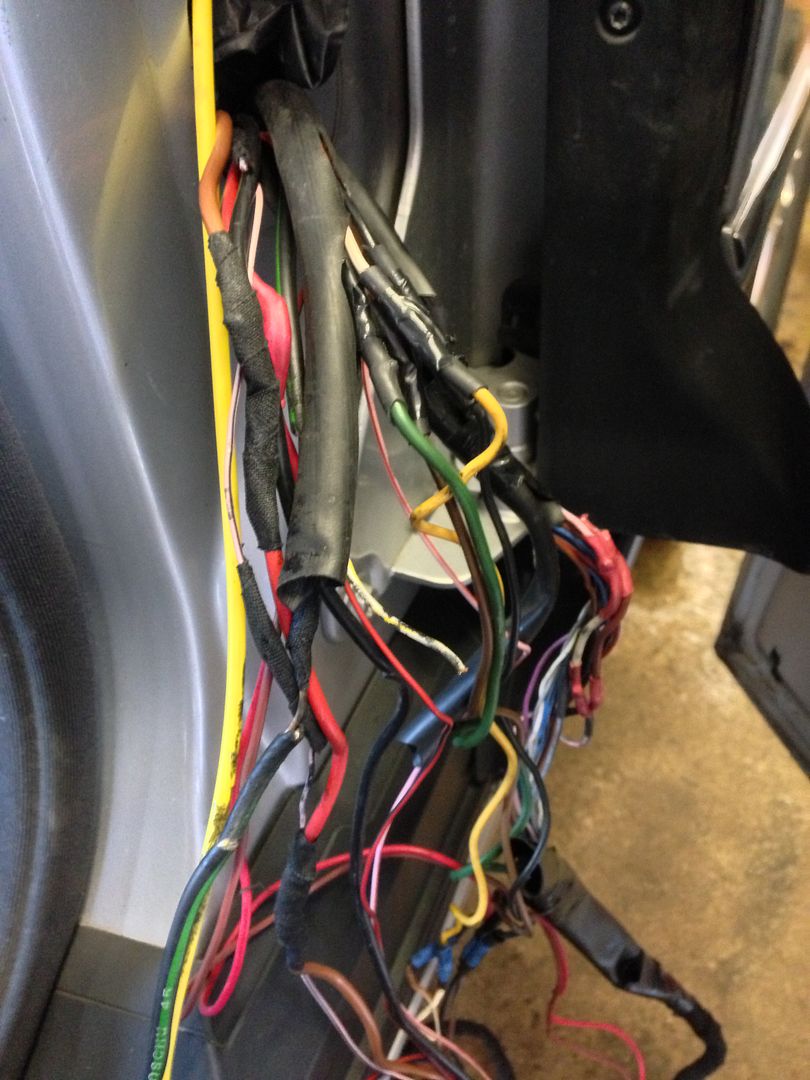
It’s in three separate looms so I pulled them into the car one at a time, then it was just a case of cutting out, soldering in and heat shrinking where needed, three wires were actually broken including one for the airbag and about a dozen more were very hard and needed replacing, the can bus wires were chaffed through so I had to do them as well, very fine wires and a pig to do.....
I decided not to retape the harness as this IMHO seems to help in breaking them!! keeps them all tight together so they have to bend in one.... I pulled them back through and they looked like this
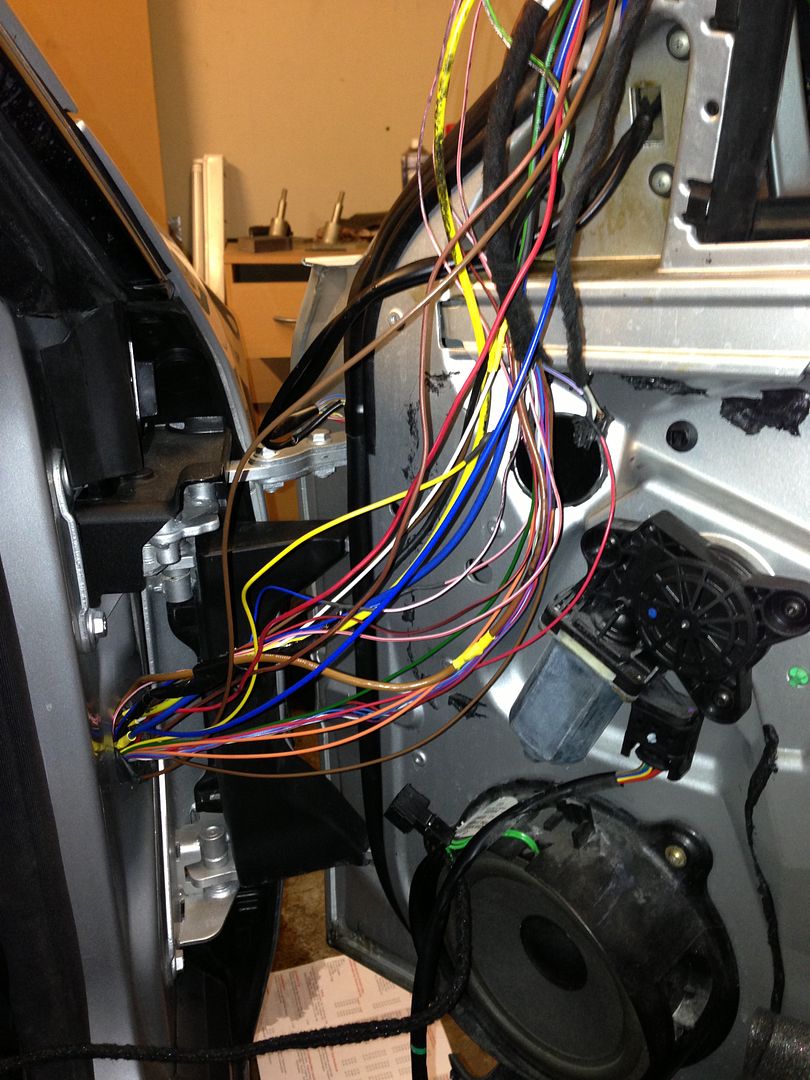
looks a bit messy but they are now all done correctly
I used some nylon expanding sleeving I had in the garage, came off some old car I had, it's very flexible and smooth so seemed the ideal candidate... hope it does what I hope it will!!
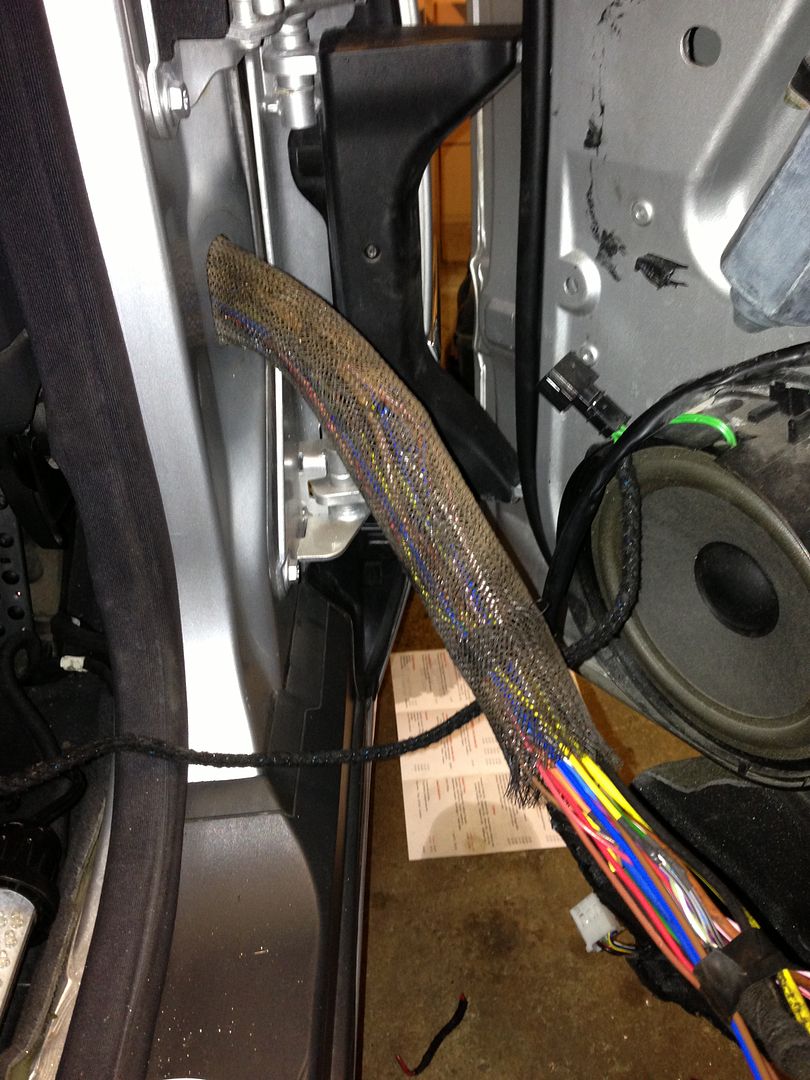
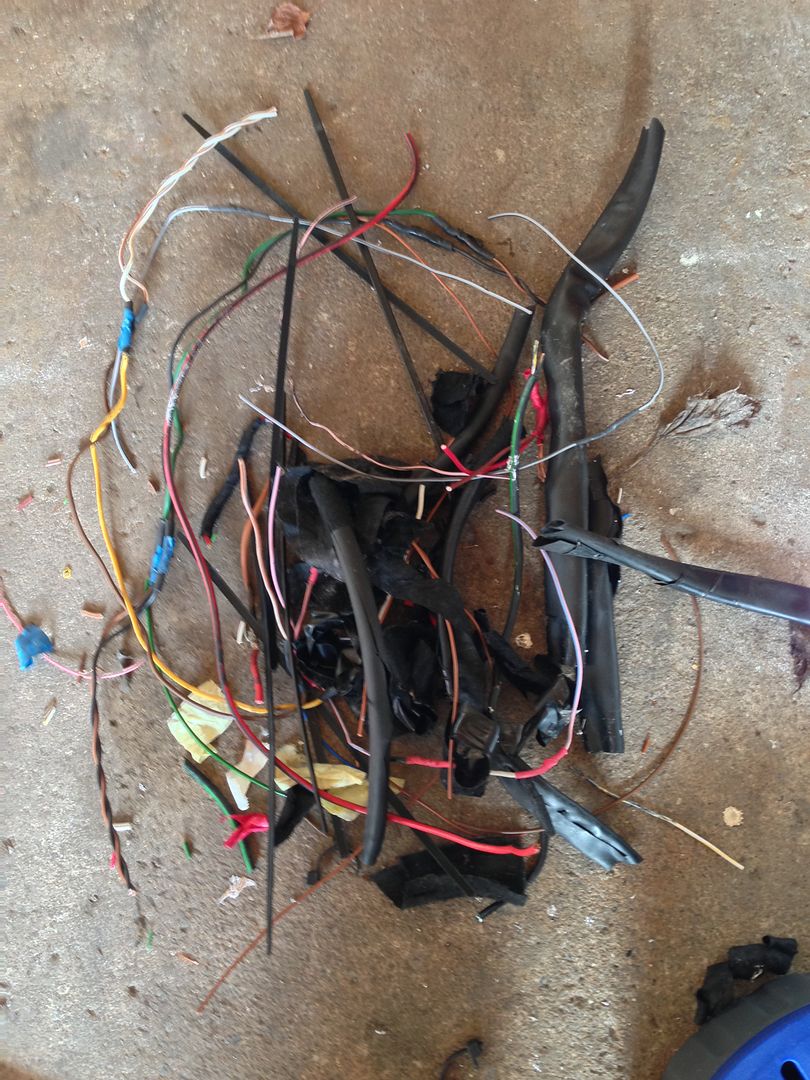
Then it was just a case of feeding it all through and plugging it all in, refix the loom and put the door back together, all in all took about 3 hours with a few coffee breaks.... ended up with this lot on the floor afterwards!!!
Took it to our local indie and he turned the airbag light off for the modest price of £10... very good of him as I hate to think what the dealer would charge!!!
Whilst at the indie I had to pull it into the garage and squeeze it in so ended up with it parked on full lock, don't like leaving it like that when parked as it puts undue stress on the steering but I thought it won't be for long so would be OK..... lucky I did as I found the front two tyres were rather badly worn on the very inside edge, I knew they were not far off the wear lines and I had been doing research on replacements but thought these would be OK for the MOT.... how wrong I was!!!
This is what it looked like from looking under the arch.... could see a bit of feathering on the inside edge
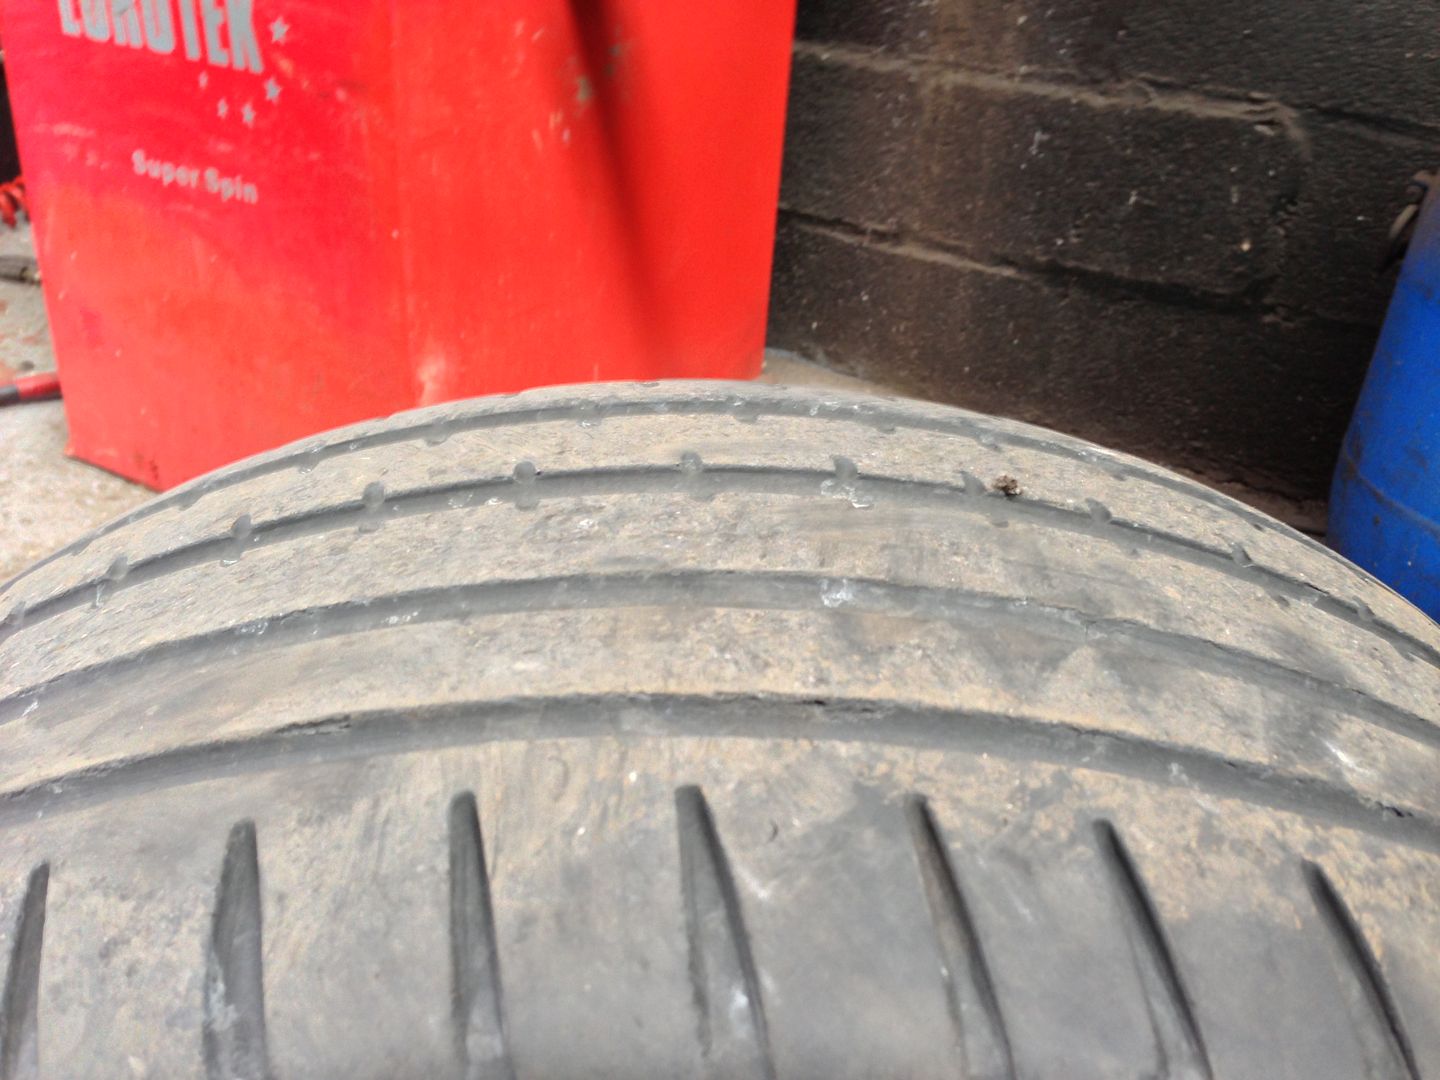
But this wear is well past the edge, nearly on the sidewall....
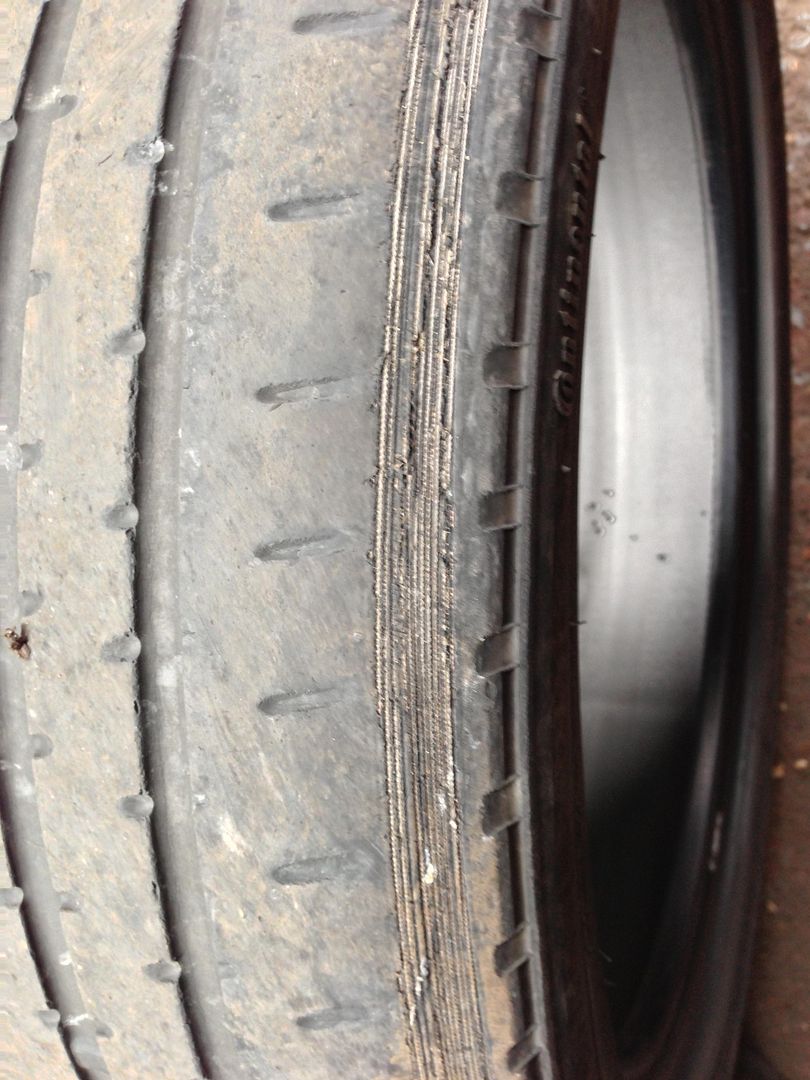
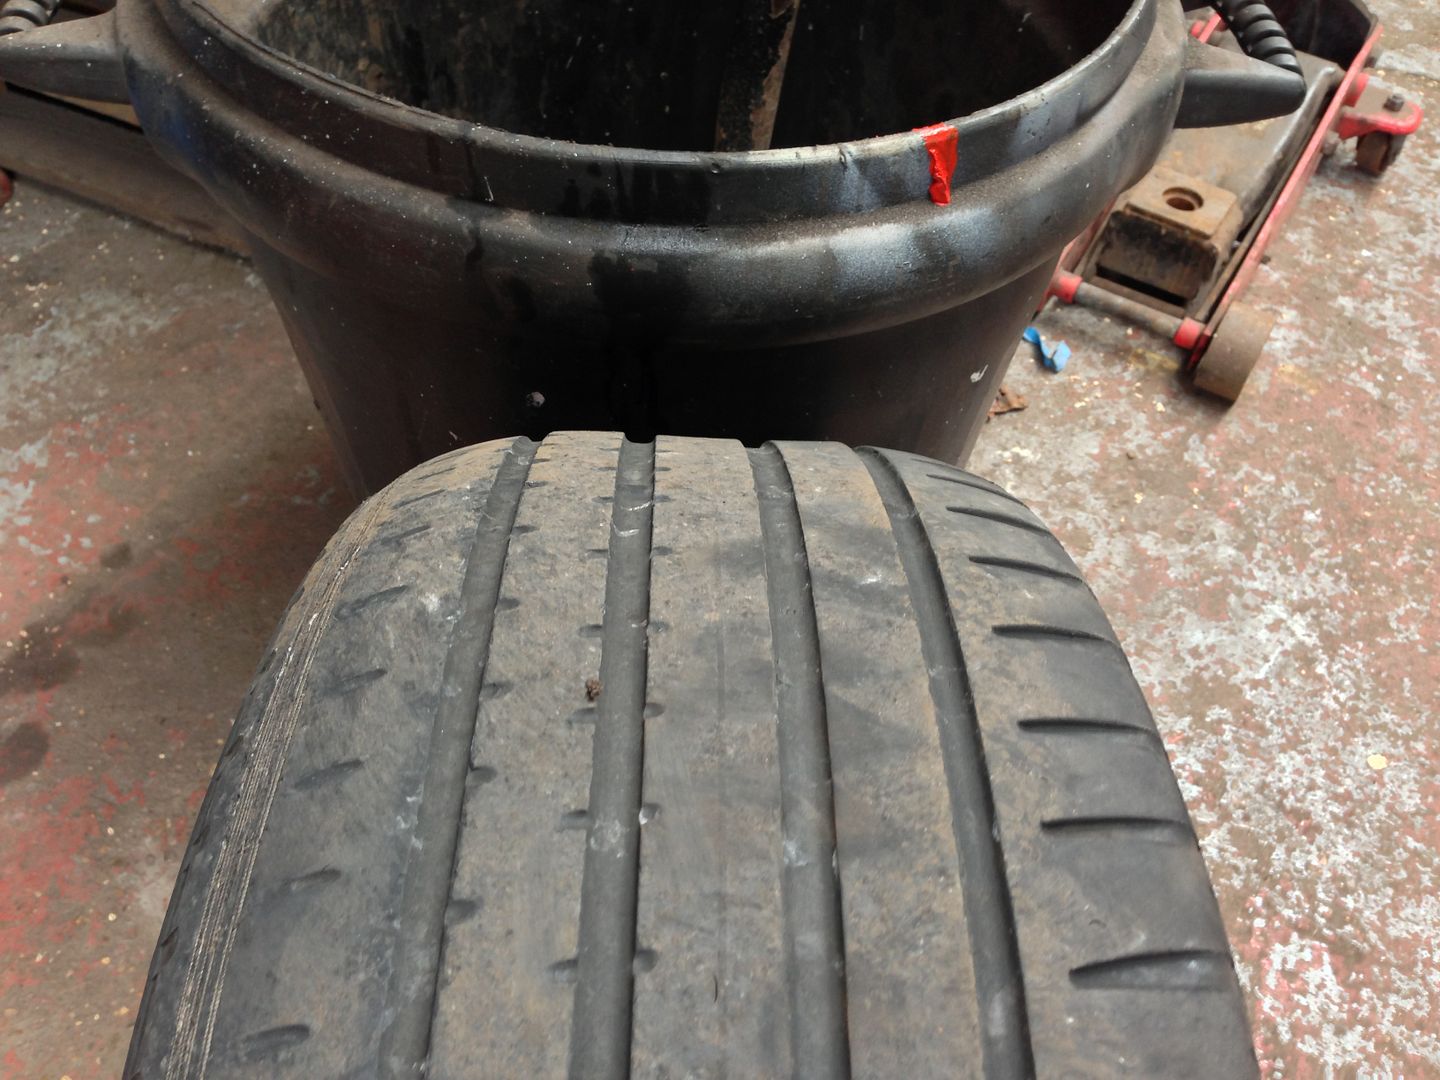
So after some new 245/40/18's with a minimum Z speed rating... also a tyre make that does both sizes fitted to the CL500 so have to come in 265/40/18 as well....
It's got Continentals on the front and Dunlops on the back at present, read loads of tyre reviews and came to the conclusion that it's pot luck with tyre wear/noise/grip etc.... seems to depend a lot on the car type.... prices for premium brands started at about £130 a tyre and went upwards...
Then came across Maxxis, had several offroaders in the past with their mud tyres and was really impressed with them...
To cut a long story short I went for Maxxis MA-Z1 track day/drift tyres these are 245/40/18 97W so exceed the Z rating and a pretty high load rating, they get excellent reviews and are supposed to be the holy grail of tyres.... grip well and last well.... er yeah right!!!!
Maxxi are trying to get into the Drift scene at the moment so have developed this tyre to be very tough and not delaminate under track day/drifting conditions.... maybe they will last longer than the Conties... they were also only £81 so I thought for that price I'd give them a go, I expect them to be a bit loud with that aggressive V shaped tread pattern
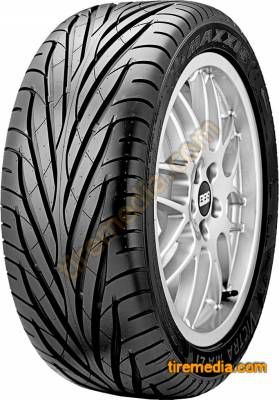
They turned up so I popped down to a mate to get him to put them on, fitted and balanced no problem, asked him to balance the rears as well and then came the fun.... some total (fill in your favourite slander) head had rattle gunned on the locking wheel nuts, so out came the breaker bar and unfortunately it lived up to its name.... one rear came off alright then this happened on the other one

My mate offered to have a go with some removal tools but he was getting a queue so I said I'd sort it myself seeing as they didn't "have" to come off....
Dropped in at the Main Dealers on the way home and had a chat with Service, they said they'd have a go.... sat and drank coffee for over an hour getting more and more worried about the cost!!! Was then told they found a key that fitted and had managed to loosen all 4 off and correctly retorqued them, he handed me a new locking wheel nut, I asked how much and he just said "That's OK, no charge" well, after falling over I thanked him a thousand times and went to try the new front tyres out on the way to the MOT station....
First impressions are good, very crisp turn in, not to hard a ride and quieter than the worn out Continentals... I expect these will get louder as they wear...
Got it MOT'd and it sailed through with not even an advisory so dead chuffed...
A few more ideas in the pipeline so watch this space....
Costs
Wiring £14
Air bag light reset £10
Tyres £162
Fitting £20
MOT £40
So £246.... not bad at all, this CL has not cost as much as I thought it would (and yes, I know I shouldn't have said that!!!)
Well that dreaded MOT time had come round so I had to fix the only problem I knew of, the airbag warning light has been on for a while, had it code read and it was the driver’s side airbag so obviously suffering from the door loom problem (those who don't know it's the fact that it has the double opening hinges on the doors so they open wide but not far, makes the wiring to the door bend twice and get pulled every time you open the door, after a while the wires become work hardened and snap)
The only real fix is to take the whole loom out of the door, feed it back through to the drivers foot well and replace the wires one at a time, there are 28 wires and the vacuum pipe for the soft close doors, I bought some wire from eBay in assorted sizes and colours and started...
Door panel off (look on YouTube if you need to know how it comes off) then removed the keyless entry aerial unclip and unplug all the wiring harness and tape it up to feed it back through

This is the tunnel they put from the face of the door through to the door jam, makes it easy to get the wires through

Started to pull it back through and you can see where someone has been in there before

Pulled it back through and took the door jamb cover off and found this mess!!!

It’s in three separate looms so I pulled them into the car one at a time, then it was just a case of cutting out, soldering in and heat shrinking where needed, three wires were actually broken including one for the airbag and about a dozen more were very hard and needed replacing, the can bus wires were chaffed through so I had to do them as well, very fine wires and a pig to do.....
I decided not to retape the harness as this IMHO seems to help in breaking them!! keeps them all tight together so they have to bend in one.... I pulled them back through and they looked like this

looks a bit messy but they are now all done correctly
I used some nylon expanding sleeving I had in the garage, came off some old car I had, it's very flexible and smooth so seemed the ideal candidate... hope it does what I hope it will!!

Then it was just a case of feeding it all through and plugging it all in, refix the loom and put the door back together, all in all took about 3 hours with a few coffee breaks.... ended up with this lot on the floor afterwards!!!

Took it to our local indie and he turned the airbag light off for the modest price of £10... very good of him as I hate to think what the dealer would charge!!!
Whilst at the indie I had to pull it into the garage and squeeze it in so ended up with it parked on full lock, don't like leaving it like that when parked as it puts undue stress on the steering but I thought it won't be for long so would be OK..... lucky I did as I found the front two tyres were rather badly worn on the very inside edge, I knew they were not far off the wear lines and I had been doing research on replacements but thought these would be OK for the MOT.... how wrong I was!!!
This is what it looked like from looking under the arch.... could see a bit of feathering on the inside edge

But this wear is well past the edge, nearly on the sidewall....


So after some new 245/40/18's with a minimum Z speed rating... also a tyre make that does both sizes fitted to the CL500 so have to come in 265/40/18 as well....
It's got Continentals on the front and Dunlops on the back at present, read loads of tyre reviews and came to the conclusion that it's pot luck with tyre wear/noise/grip etc.... seems to depend a lot on the car type.... prices for premium brands started at about £130 a tyre and went upwards...
Then came across Maxxis, had several offroaders in the past with their mud tyres and was really impressed with them...
To cut a long story short I went for Maxxis MA-Z1 track day/drift tyres these are 245/40/18 97W so exceed the Z rating and a pretty high load rating, they get excellent reviews and are supposed to be the holy grail of tyres.... grip well and last well.... er yeah right!!!!
Maxxi are trying to get into the Drift scene at the moment so have developed this tyre to be very tough and not delaminate under track day/drifting conditions.... maybe they will last longer than the Conties... they were also only £81 so I thought for that price I'd give them a go, I expect them to be a bit loud with that aggressive V shaped tread pattern

They turned up so I popped down to a mate to get him to put them on, fitted and balanced no problem, asked him to balance the rears as well and then came the fun.... some total (fill in your favourite slander) head had rattle gunned on the locking wheel nuts, so out came the breaker bar and unfortunately it lived up to its name.... one rear came off alright then this happened on the other one

My mate offered to have a go with some removal tools but he was getting a queue so I said I'd sort it myself seeing as they didn't "have" to come off....
Dropped in at the Main Dealers on the way home and had a chat with Service, they said they'd have a go.... sat and drank coffee for over an hour getting more and more worried about the cost!!! Was then told they found a key that fitted and had managed to loosen all 4 off and correctly retorqued them, he handed me a new locking wheel nut, I asked how much and he just said "That's OK, no charge" well, after falling over I thanked him a thousand times and went to try the new front tyres out on the way to the MOT station....
First impressions are good, very crisp turn in, not to hard a ride and quieter than the worn out Continentals... I expect these will get louder as they wear...
Got it MOT'd and it sailed through with not even an advisory so dead chuffed...
A few more ideas in the pipeline so watch this space....
Costs
Wiring £14
Air bag light reset £10
Tyres £162
Fitting £20
MOT £40
So £246.... not bad at all, this CL has not cost as much as I thought it would (and yes, I know I shouldn't have said that!!!)
mercedescl500
Active Member
Haylands said:Thanks for the comments guys...
Well that dreaded MOT time had come round so I had to fix the only problem I knew of, the airbag warning light has been on for a while, had it code read and it was the drivers side airbag so obviously suffering from the door loom problem (those who don't know it's the fact that it has the double opening hinges on the doors so they open wide but not far, makes the wiring to the door bend twice and get pulled every time you open the door, after a while the wires become work hardened and snap)
The only real fix is to take the whole loom out of the door, feed it back through to the drivers foot well and replace the wires one at a time, there are 28 wires and the vacuum pipe for the soft close doors, I bought some wire from eBay in assorted sizes and colours and started...
Door panel off (look on YouTube if you need to know how it comes off) then removed the keyless entry aerial unclip and unplug all the wiring harness and tape it up to feed it back through
http://s252.photobucket.com/user/arativ/media/Mercedes CL500/IMG_0215_zps71f63b97.jpg.html
This is the tunnel they put from the face of the door through to the door jam, makes it easy to get the wires through
http://s252.photobucket.com/user/arativ/media/Mercedes CL500/IMG_0216_zpsd7482b41.jpg.html
Started to pull it back through and you can see where someone has been in there before
http://s252.photobucket.com/user/arativ/media/Mercedes CL500/IMG_0217_zpsfe3cebb1.jpg.html
Pulled it back through and took the door jamb cover off and found this mess!!!
http://s252.photobucket.com/user/arativ/media/Mercedes CL500/IMG_0219_zps8e7060a9.jpg.html
Its in three separate looms so I pulled them into the car one at a time, then it was just a case of cutting out, soldering in and heat shrinking where needed, three wires were actually broken including one for the airbag and about a dozen more were very hard and needed replacing, the can bus wires were chaffed through so I had to do them as well, very fine wires and a pig to do.....
I decided not to retape the harness as this IMHO seems to help in breaking them!! keeps them all tight together so they have to bend in one.... I pulled them back through and they looked like this
http://s252.photobucket.com/user/arativ/media/Mercedes CL500/IMG_0224_zps616df2d2.jpg.html
looks a bit messy but they are now all done correctly
I used some nylon expanding sleeving I had in the garage, came off some old car I had, it's very flexible and smooth so seemed the ideal candidate... hope it does what I hope it will!!
http://s252.photobucket.com/user/arativ/media/Mercedes CL500/IMG_0225_zps188cb83b.jpg.html
Then it was just a case of feeding it all through and plugging it all in, refix the loom and put the door back together, all in all took about 3 hours with a few coffee breaks.... ended up with this lot on the floor afterwards!!!
http://s252.photobucket.com/user/arativ/media/Mercedes CL500/IMG_0227_zps0a28839f.jpg.html
Took it to our local indie and he turned the airbag light off for the modest price of £10... very good of him as I hate to think what the dealer would charge!!!
Whilst at the indie I had to pull it into the garage and squeeze it in so ended up with it parked on full lock, don't like leaving it like that when parked as it puts undue stress on the steering but I thought it won't be for long so would be OK..... lucky I did as I found the front two tyres were rather badly worn on the very inside edge, I knew they were not far off the wear lines and I had been doing research on replacements but thought these would be OK for the MOT.... how wrong I was!!!
This is what it looked like from looking under the arch.... could see a bit of feathering on the inside edge
http://s252.photobucket.com/user/arativ/media/Mercedes CL500/IMG_0233_zps3755a2fe.jpg.html
But this wear is well past the edge, nearly on the sidewall....
http://s252.photobucket.com/user/arativ/media/Mercedes CL500/IMG_0231_zps9c98dda0.jpg.html
http://s252.photobucket.com/user/arativ/media/Mercedes CL500/IMG_0234_zps1047a6b2.jpg.html
So after some new 245/40/18's with a minimum Z speed rating... also a tyre make that does both sizes fitted to the CL500 so have to come in 265/40/18 as well....
It's got Continentals on the front and Dunlops on the back at present, read loads of tyre reviews and came to the conclusion that it's pot luck with tyre wear/noise/grip etc.... seems to depend a lot on the car type.... prices for premium brands started at about £130 a tyre and went upwards...
Then came across Maxxis, had several offroaders in the past with their mud tyres and was really impressed with them...
To cut a long story short I went for Maxxis MA-Z1 track day/drift tyres these are 245/40/18 97W so exceed the Z rating and a pretty high load rating, they get excellent reviews and are supposed to be the holy grail of tyres.... grip well and last well.... er yeah right!!!!
Maxxi are trying to get into the Drift scene at the moment so have developed this tyre to be very tough and not delaminate under track day/drifting conditions.... maybe they will last longer than the Conties... they were also only £81 so I thought for that price I'd give them a go, I expect them to be a bit loud with that aggressive V shaped tread pattern
http://s252.photobucket.com/user/ar...L500/maxxis-ma-z1-victra_zpsc2cf7cdb.jpg.html
They turned up so I popped down to a mate to get him to put them on, fitted and balanced no problem, asked him to balance the rears as well and then came the fun.... some total (fill in your favourite slander) head had rattle gunned on the locking wheel nuts, so out came the breaker bar and unfortunately it lived up to its name.... one rear came off alright then this happened on the other one
http://s252.photobucket.com/user/arativ/media/Mercedes CL500/IMG_0235_zps4b335a51.jpg.html
My mate offered to have a go with some removal tools but he was getting a queue so I said I'd sort it myself seeing as they didn't "have" to come off....
Dropped in at the Main Dealers on the way home and had a chat with Service, they said they'd have a go.... sat and drank coffee for over an hour getting more and more worried about the cost!!! Was then told they found a key that fitted and had managed to loosen all 4 off and correctly retorqued them, he handed me a new locking wheel nut, I asked how much and he just said "That's OK, no charge" well, after falling over I thanked him a thousand times and went to try the new front tyres out on the way to the MOT station....
First impressions are good, very crisp turn in, not to hard a ride and quieter than the worn out Continentals... I expect these will get louder as they wear...
Got it MOT'd and it sailed through with not even an advisory so dead chuffed...
A few more ideas in the pipeline so watch this space....
Costs
Wiring £14
Air bag light reset £10
Tyres £162
Fitting £20
MOT £40
So £246.... not bad at all, this CL has not cost as much as I thought it would (and yes, I know I shouldn't have said that!!!)
Haylands, thank you for posting this and also one of the best DIY's in ages. Your post is the FIRST (sorry would underline but using phone) and only post that covers this issue so well. Cheers.
- Joined
- Apr 15, 2005
- Messages
- 7,552
- Location
- Weybridge. U.K
- Car
- 500L ( W221 ), 2014 AMG CL 5.5 Biturbo ( W216 ) Sold, 2014 Brabus Smart ( 451 Coupe ) Mapped 130bhp
+ 1
jgs600
Active Member
that was a great price for the respray.. when i had my w202 c250 estate done i had the whole lot resprayed apart from the roof and that cost me £600 cash...
car looks great well done...
car looks great well done...
Haylands
Active Member
- Joined
- May 22, 2012
- Messages
- 72
- Car
- 2000 CL500
Thanks for the comments,
Changed the Auto box fluid today along with the filter, sump bolts came out real easy but I couldn't get the sump plug out, did this to a snap-on socket!!!!! and still wouldn't budge....
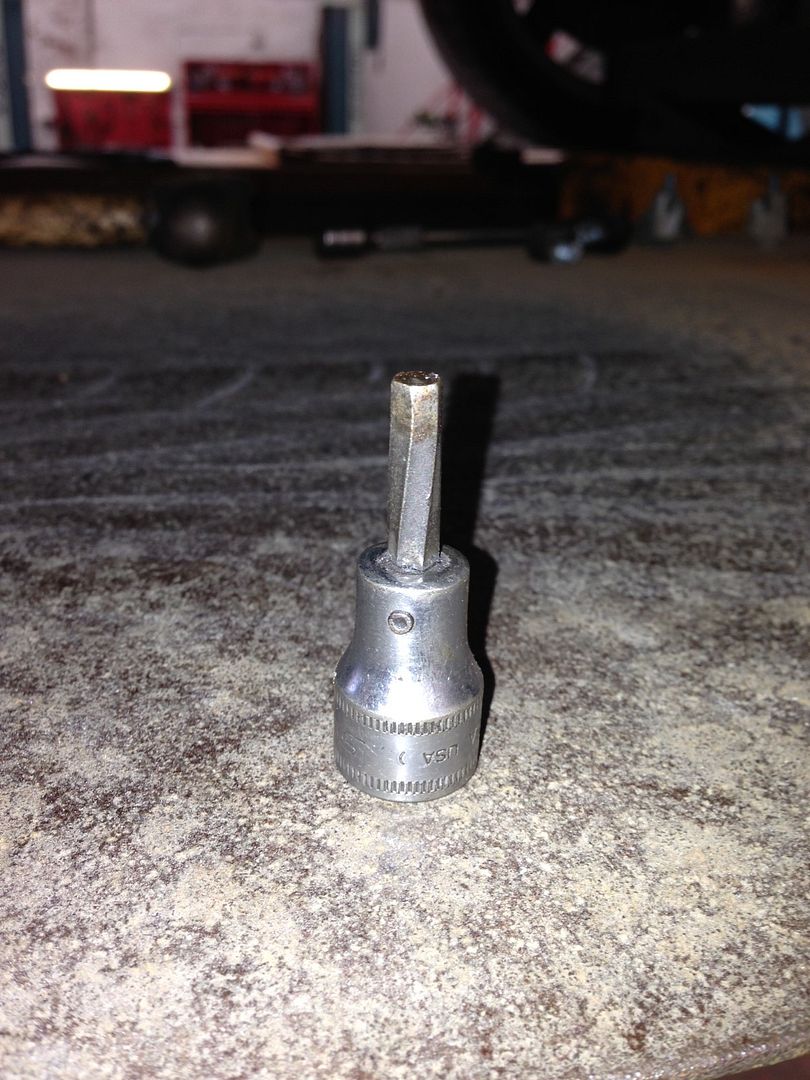
Then took it for a four wheel align, due to the wear on the front tyres, was a couple of degrees out on the tracking but the rest was OK, I can feel the difference though....
Changed the Auto box fluid today along with the filter, sump bolts came out real easy but I couldn't get the sump plug out, did this to a snap-on socket!!!!! and still wouldn't budge....

Then took it for a four wheel align, due to the wear on the front tyres, was a couple of degrees out on the tracking but the rest was OK, I can feel the difference though....
szymondeck
New Member
- Joined
- Aug 30, 2011
- Messages
- 13
- Car
- mercedes 420sec
looks good after respray!
Users who are viewing this thread
Total: 1 (members: 0, guests: 1)
